
We already done initial setup guide, but that is only tip of the iceberg for the Steam Deck. We will now go through configuration of our Steam Deck step by step – in Gaming Mode – for a start.
First things first – there are two modes on Steam Deck:
Gaming Mode – oriented and optimised for gaming experience and managing/buying games through Steam (you can also see games from other sources here)
Desktop Mode – Steam Deck is based on Linux (SteamOS 3 is based on Arch Linux) – so there is a whole Desktop experience on your Steam Deck – just like your ordinary PC – well worth your time and effort.
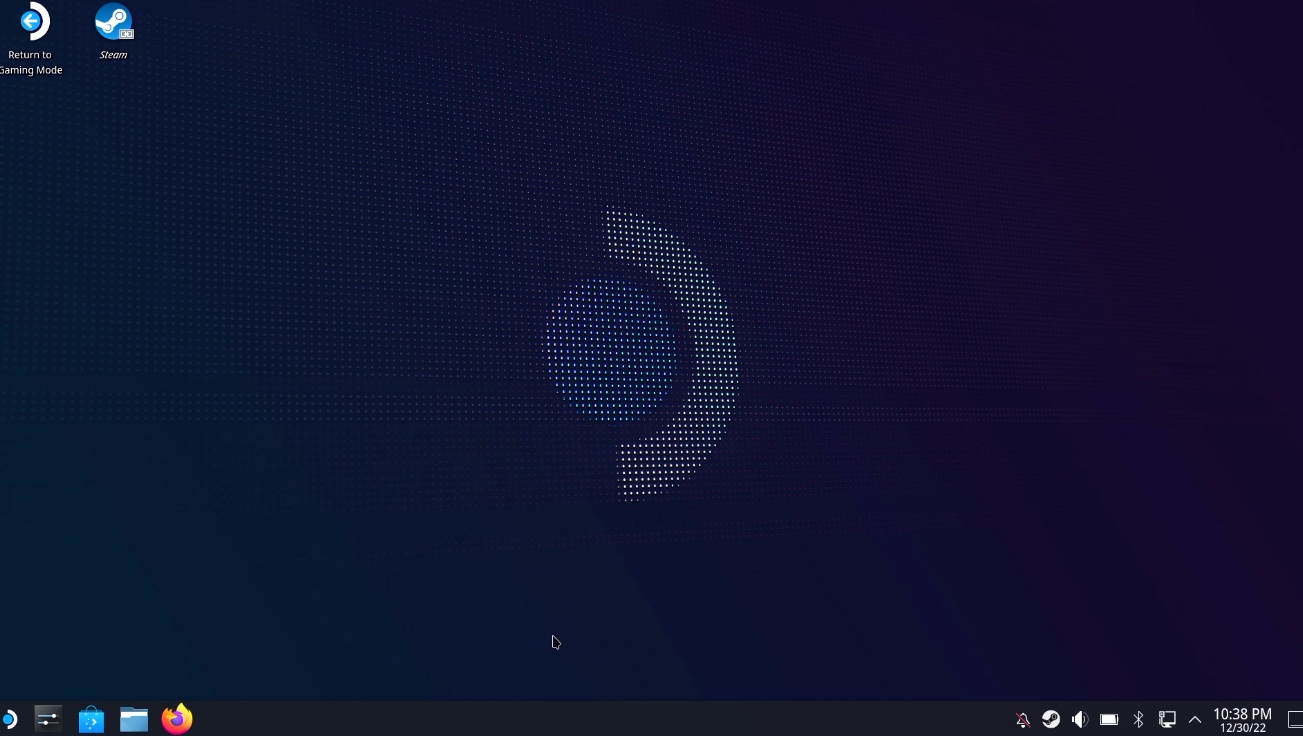
You can switch from Gaming Mode to Desktop Mode by longer pressing Power button on top of the Steam Deck and selecting – Desktop Mode. When you are in Desktop Mode, you can return to Gaming Mode by pressing “Return to Gaming Mode” shortcut on left top of your desktop.
Ok, back to the job at hand – we are going through Gaming Mode in this article. We are also going to talk about Desktop Mode, but that is much deeper and broader topic – because your Steam Deck is a PC.
This is going to be a looong article, since we are going through every option that is hiding under STEAM button.
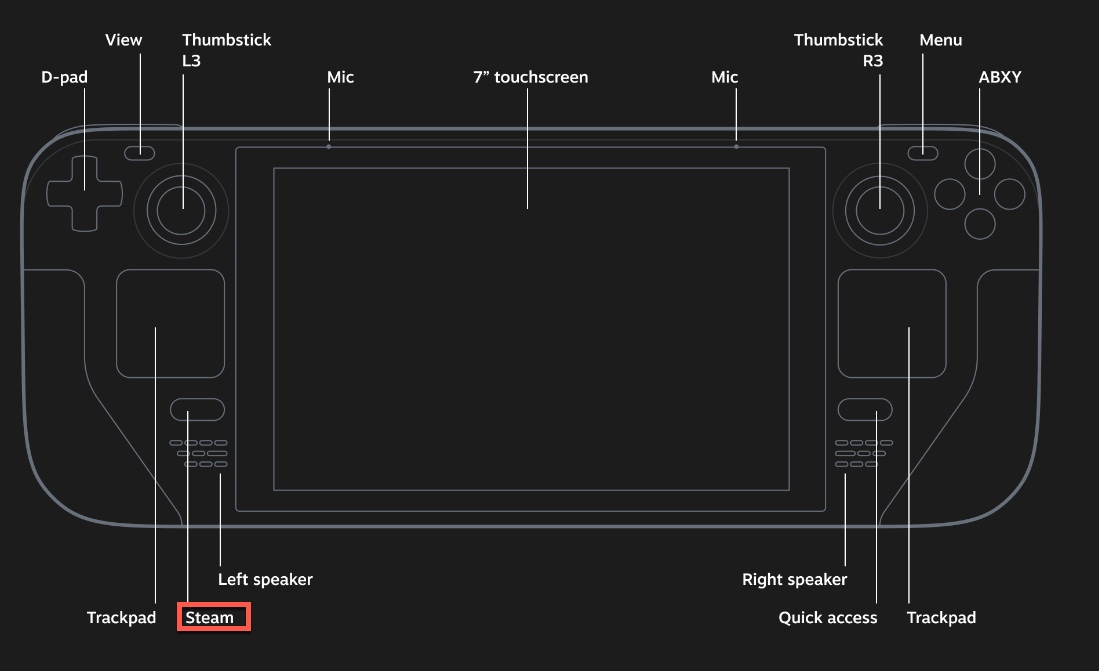
STEAM button
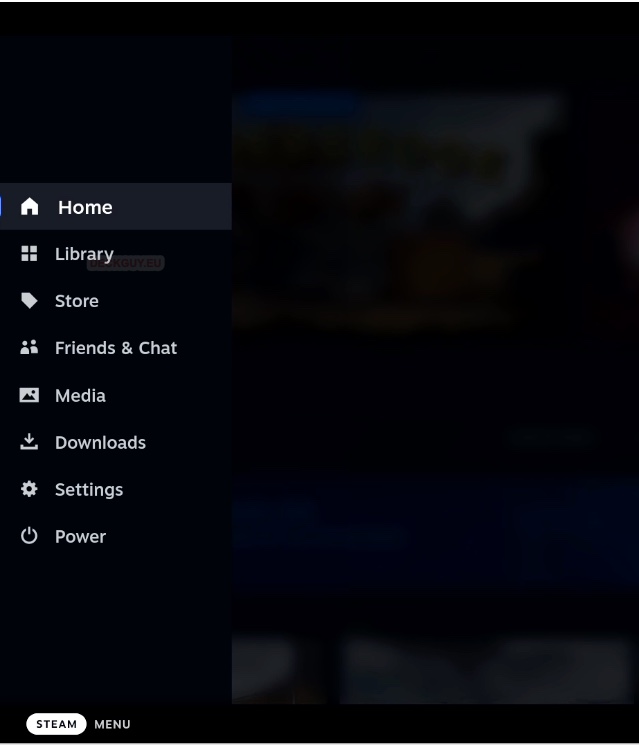
After you press Steam button on your Steam Deck you will get following menus
- Home
- Library
- Store
- Friends & Chat
- Media
- Downloads
- Settings
- Power
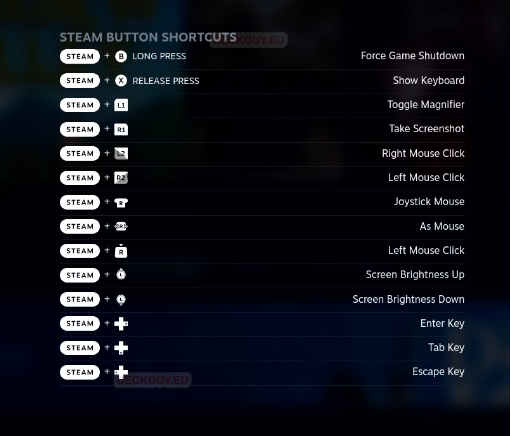
If you press and hold Steam button, you will get list of shortcuts for it, some of them can be quite useful.
Now, let’s go one by one to Menus behind Steam button – and all submenues and options…
1. Steam button – Home
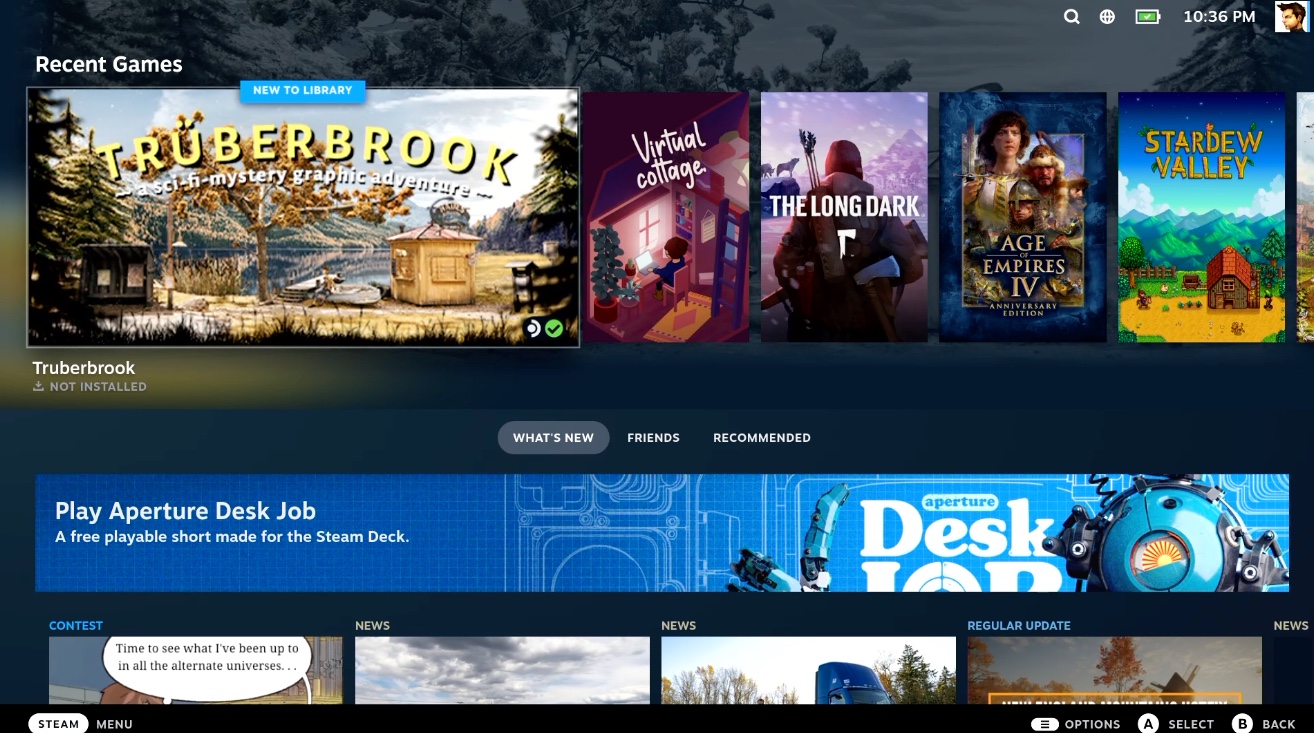
Takes you back to the homescreen of Gaming Mode – nothing more to say to that.
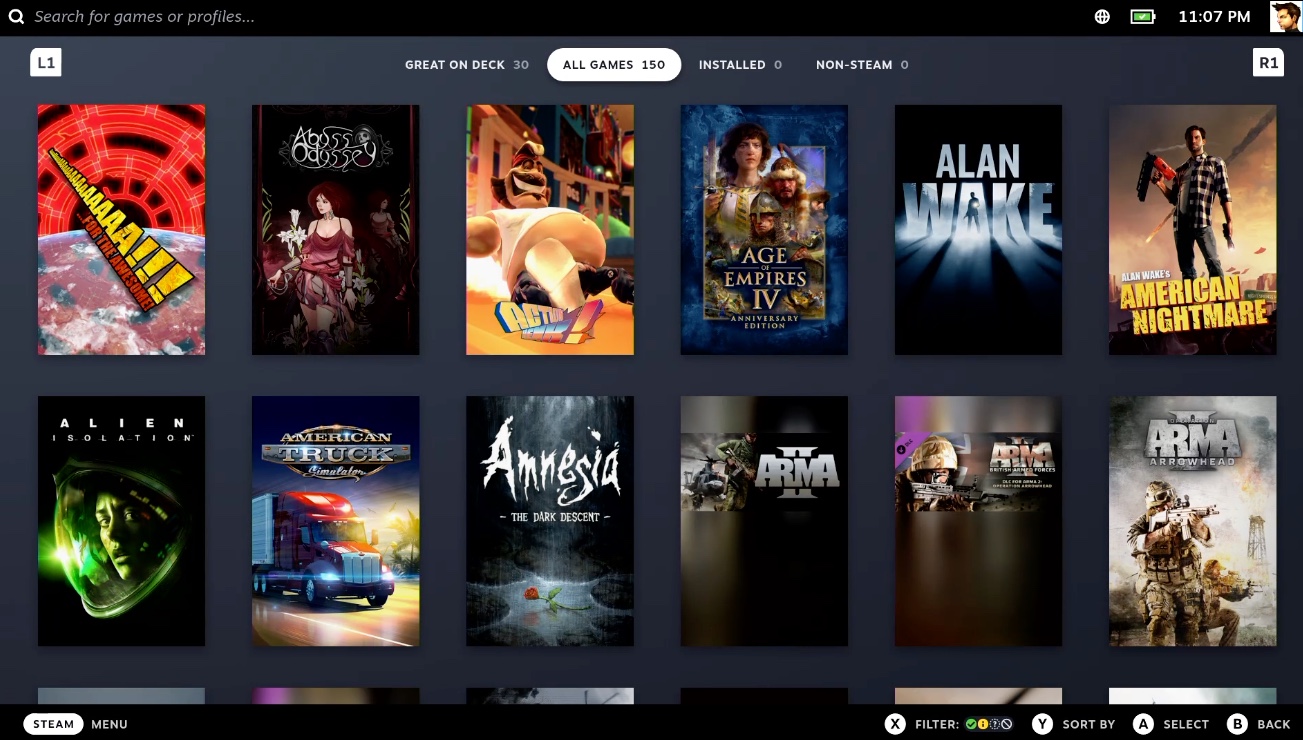
2. Steam button – Library
You can switch between menus (Great on Deck, All Games, Installed, Non-Steam) with L1 and R1 buttons on your Steam Deck.
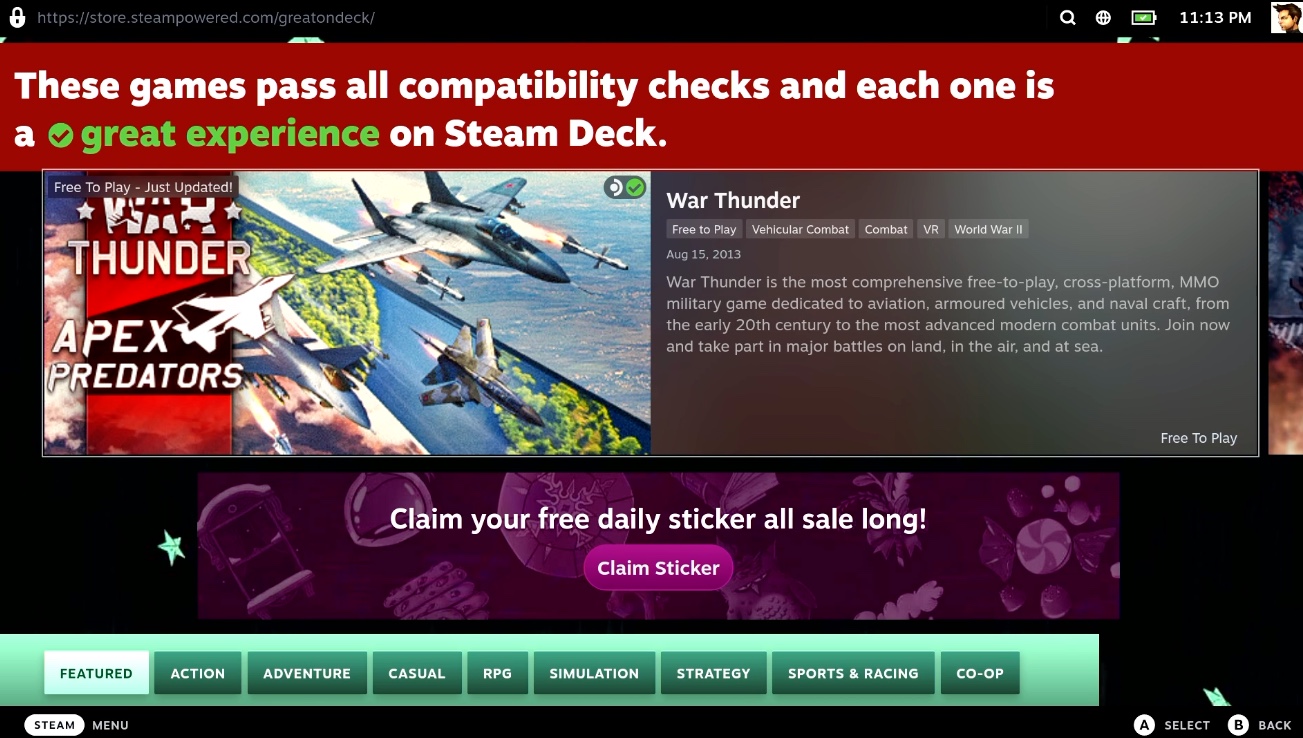
Great on Deck – games that work on Deck (don’t be fooled by that, I will cover topic of Steam Deck compatible games in separate article – many, many games work on Deck)
All Games – you can see that I have lousy 150 games in my Steam library
Installed – I started clean with my Steam Deck, so I don’t currently have installed games
Non-Steam – games from other sources – Steam Deck is opened for other launchers, platforms…
By pressing Options button (next to X and Y buttons) you will get additional menu for every game you select – we will talk about that in details when we cover games part.
By pressing X button you can filter games by compatibility – again, more details on that in article where I’m going to cover games.
Ok, let’s go further…
3. Steam button – Store
Store button will take you to the Steam Store – simple as that
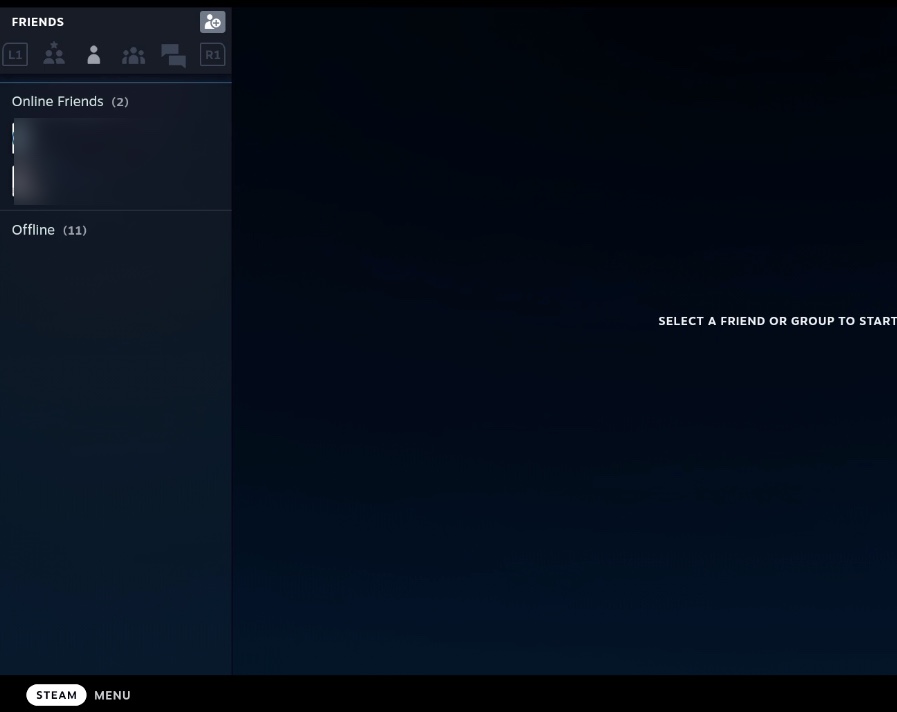
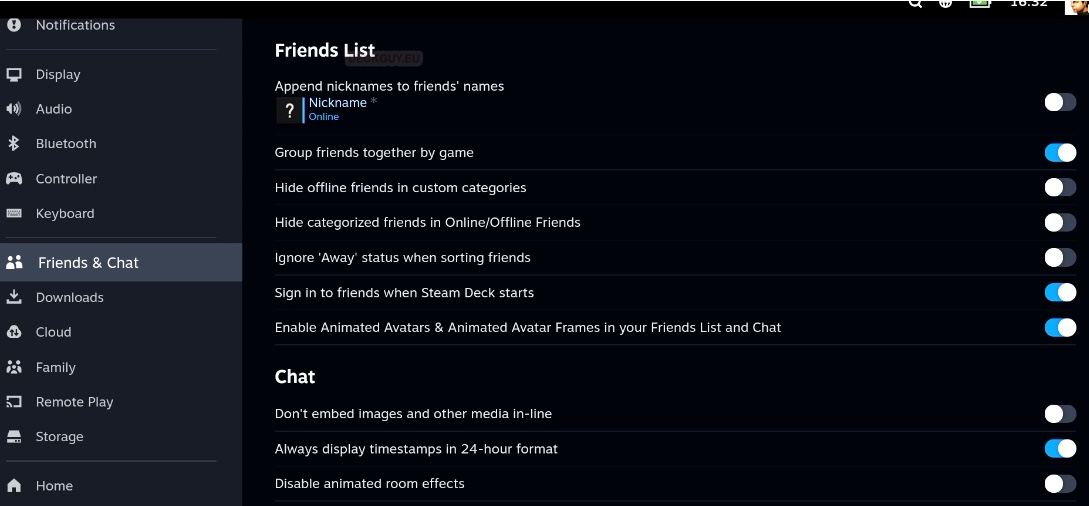
4. Steam button – Friends & Chat
Not much going on in here for me 😀 But, you get the idea what it is about. You have Favourites, Friends and Groups. Also you can see recent chat. Under Friends submenu you have option to add a friend. Under Groups, you have option to Add new Group Chat.
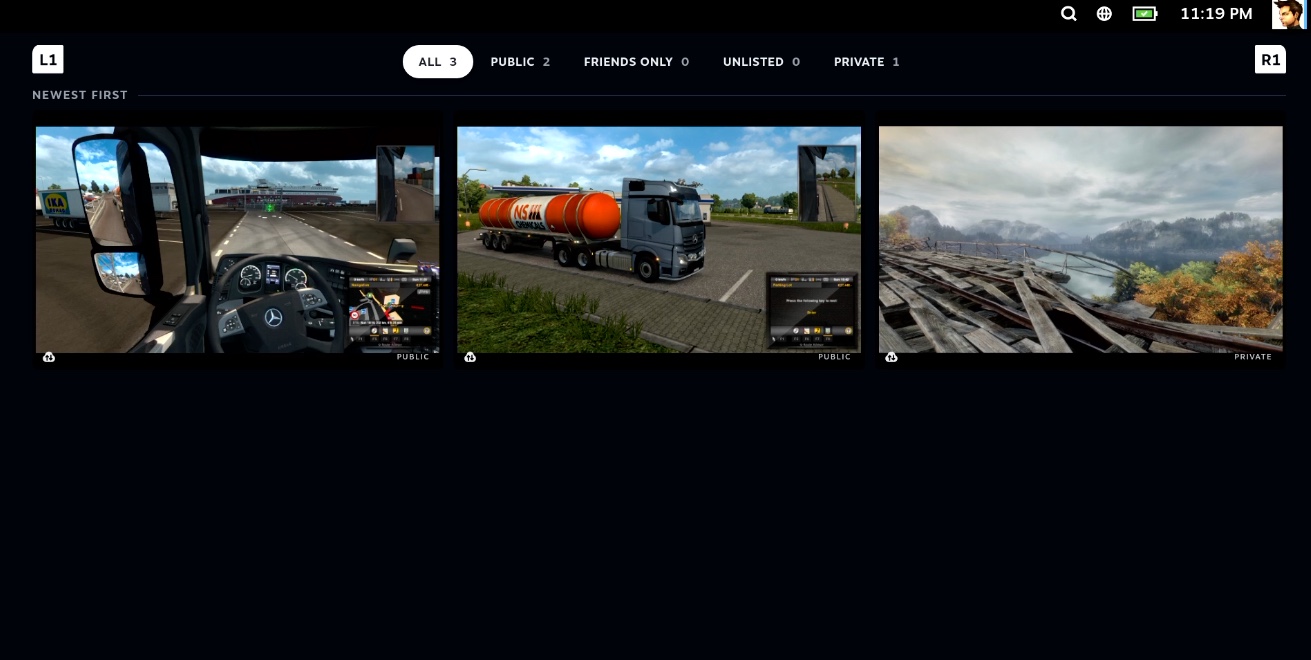
5. Steam Button – Media
You will see your screenshots/media here you made with Steam. Again, I don’t have much to brag about. I have goen through Media section in depth in this article.
Again if you press Options button under All submenu – you get to filter your media by game. You can also sort your media by newest or oldest by pressing Y.
If you select picture (or other kind of media) and press Options button – you will get option to share it, edit caption, change from public to multiple private options, add it to favorites, add spoiler tag, or delete it.
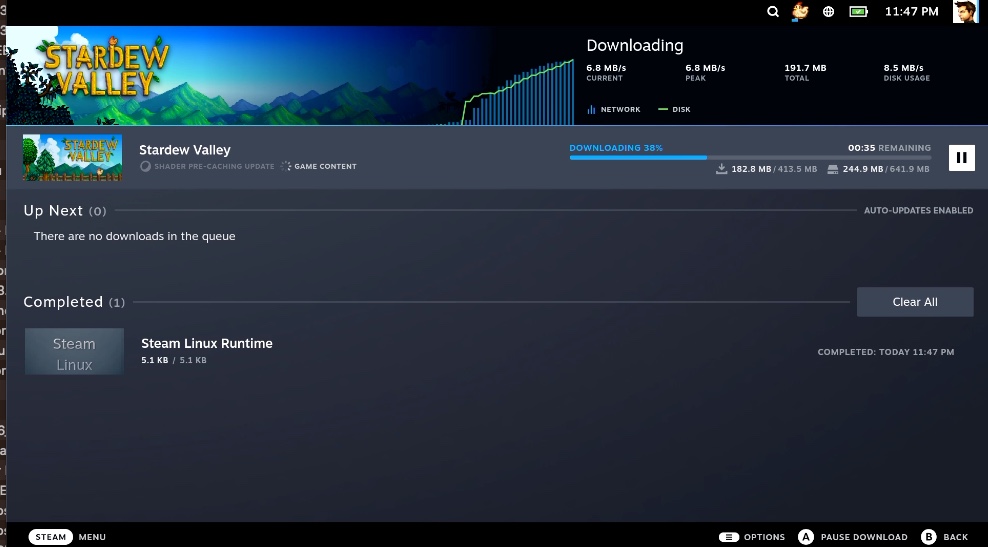
6. Steam button – Downloads
Again, pretty clear, anything you are downloading will be seen here. You can see stats of your Downloads here. There is again Options button which gives you a lot more details about games – more on that in separate article that will be dedicated to games.
7. STEAM Button – Settings
Settings part deserves biggest space because it is world for itself. We will be going through every option in Settings screen. We want to customise our Deck and make it as comfortable for our use case as possible.
- General
- System
- Security
- Internet
- Notifications
- Display
- Audio
- Bluetooth
- Controller
- Keyboard
- Friend & Chat
- Downloads
- Cloud
- Family
- Remote Play
- Storage
- Home
- Library
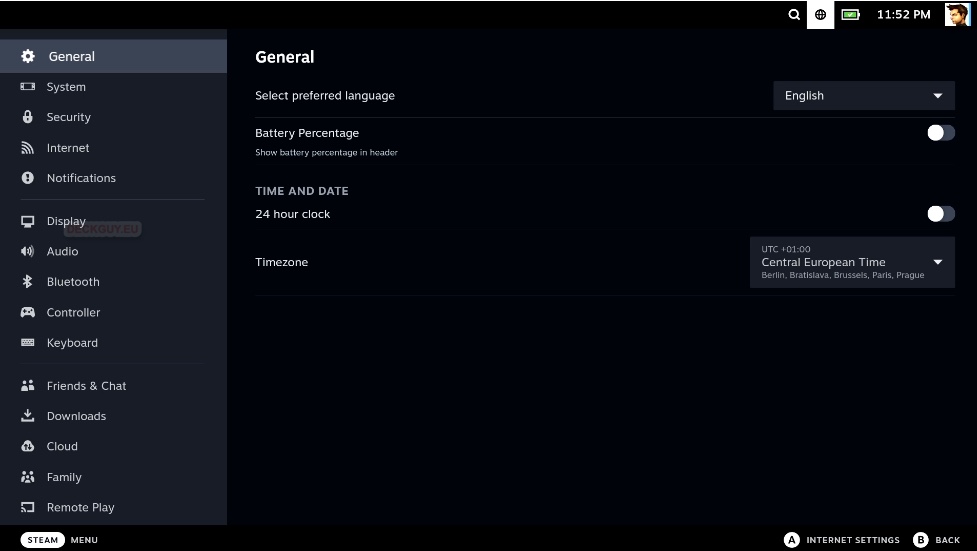
General
Here we are going to set console language – I will stay with English, I will also turn on Baterry Percentage and Time and Date to 24 hour clock. Timezone I already set, but it can be changed here. We can now see battery percentage, well time is what it is, you will need to trust me that it is 24 hour format now. 🙂

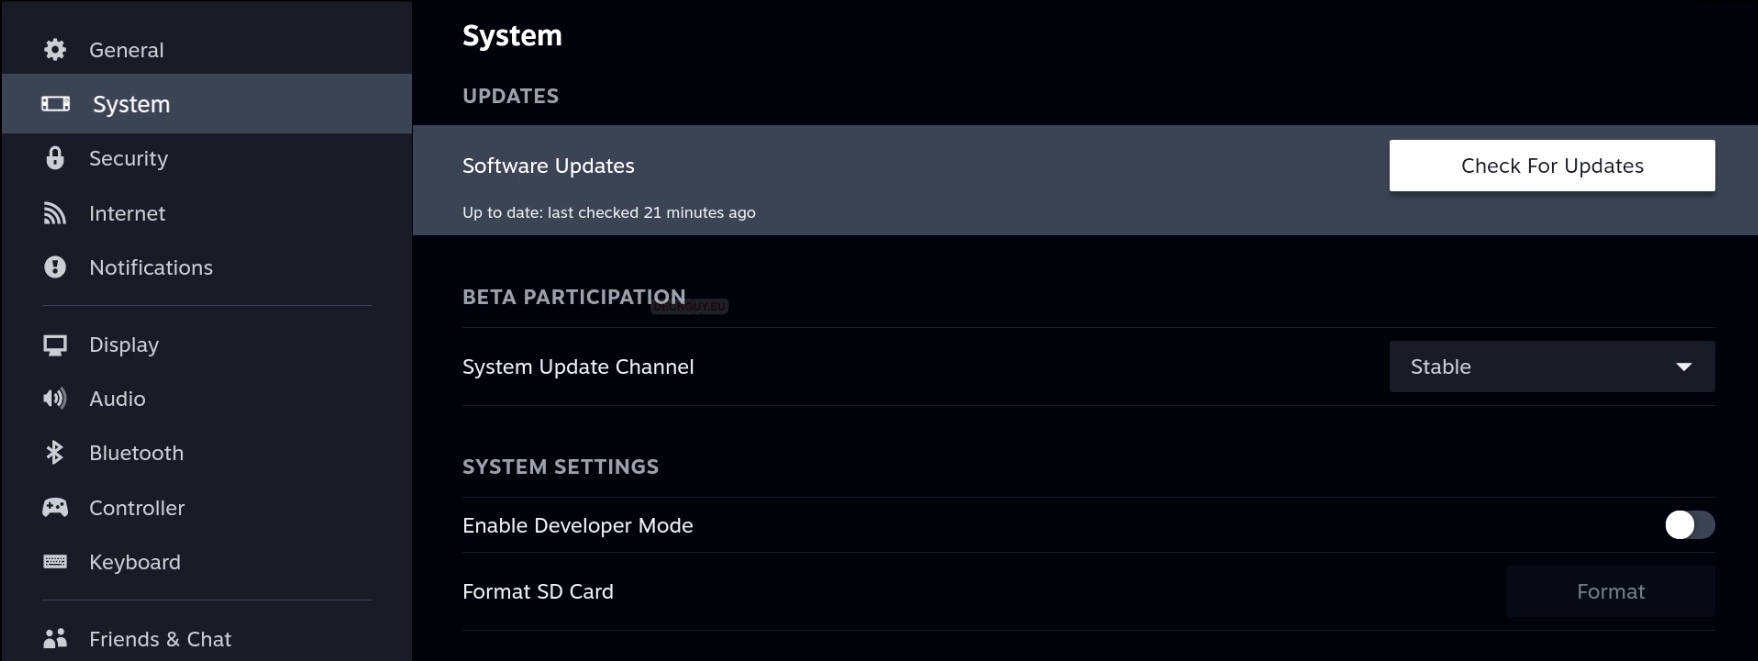
System
Under System we can see various informations regarding our console. Under UPDATES section, we can check for Updates for our SteamOS and Deck. BETA PARTICIPATION – we will stay in Stable channel. If you are new to all this, Stable is best solution. Beta and Preview channels can be buggy, but also can bring some brand new features first – before it reaches Stable channel. Anyway – if you are new to PCs, Steam Deck and unexperienced in general with software – Stable is the way.
SYSTEM SETTINGS – if you enable Developer mode – new submenu will appear at the bottom of menus where you can set some advanced things. Again, if you are completely new to everything best way is to not enable this until you are not sure what you are doing. This is the place where you will also Format your SD Card when you push one into your Steam Deck – your system will test and format SD card, before you can start and use it in your Steam Deck.
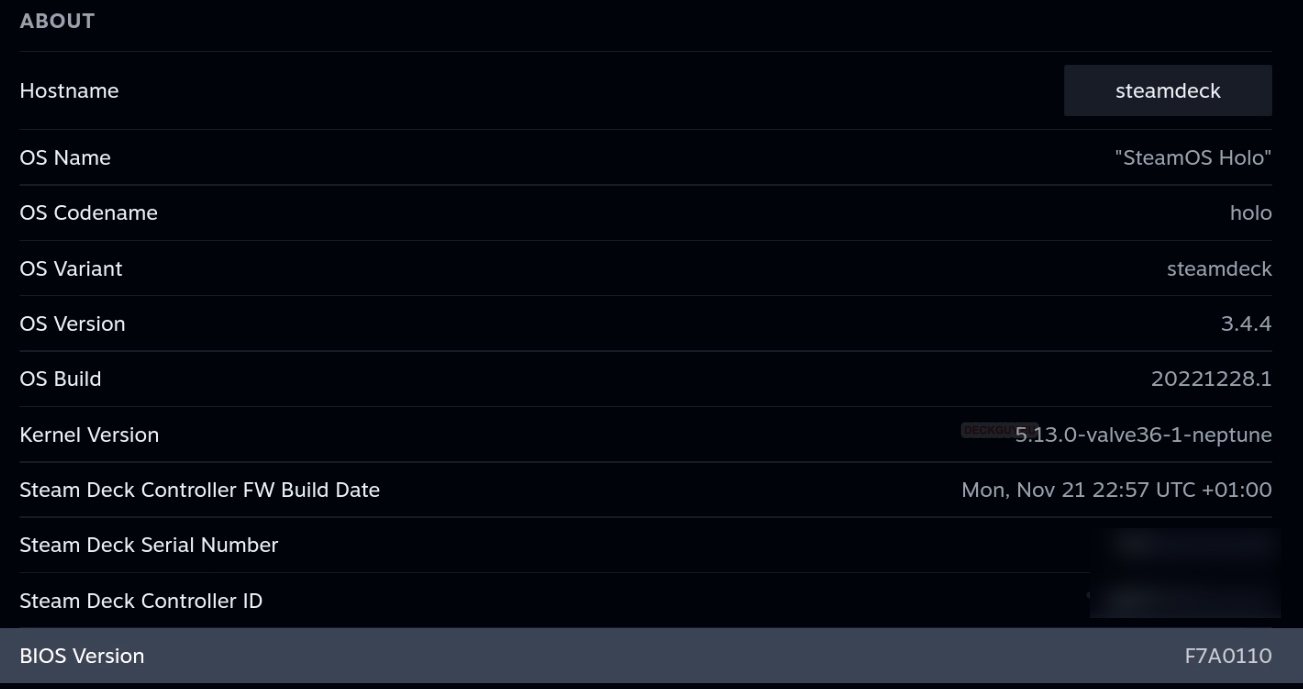
ABOUT – here you can change your console name under Hostname. In other details you can see your current software, firmware and BIOS versions and also you Steam Deck serial number. These info can be useful, especially if you need to troubleshoot something.
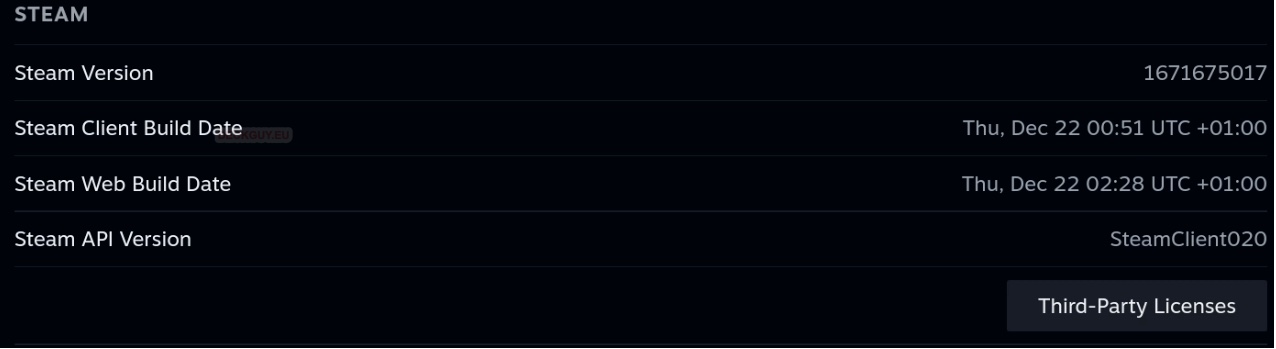
STEAM – here you can see Steam Client version you have installed on your Steam Deck.
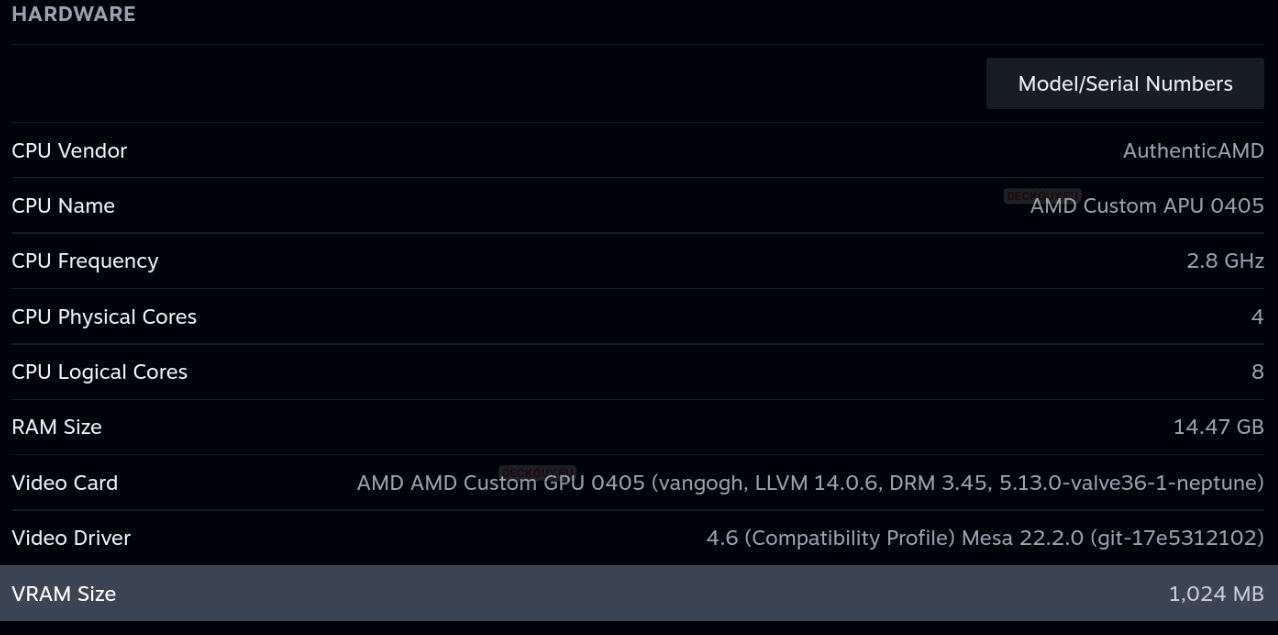
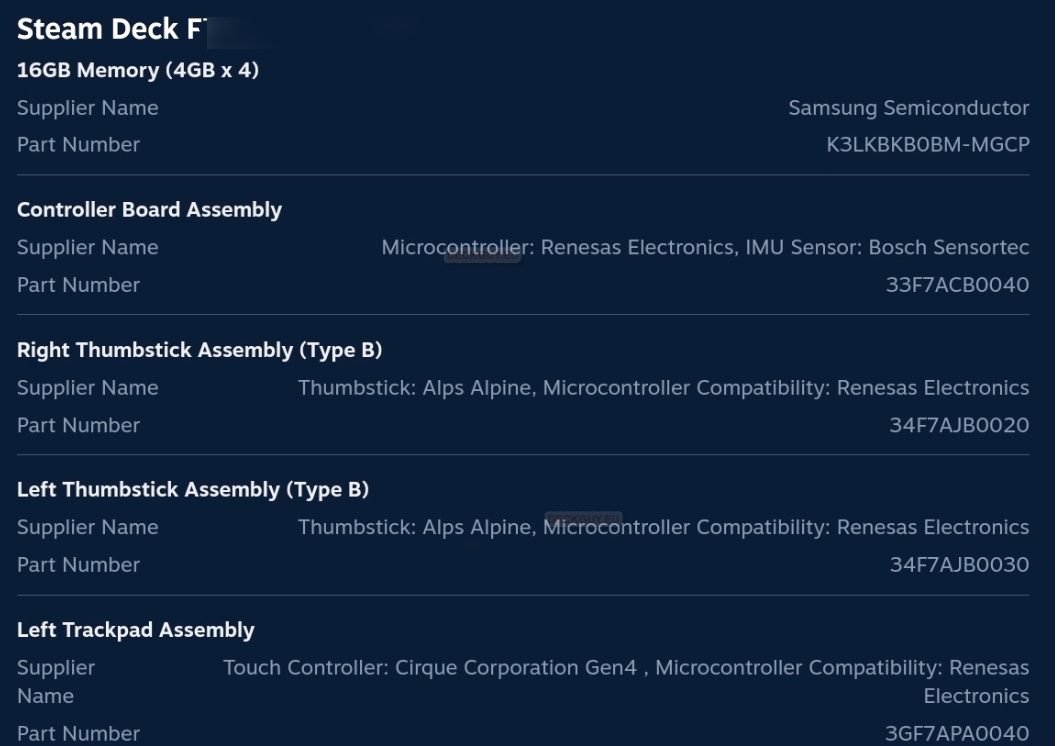
HARDWARE – this portion will have hardware details of your console – CPU, RAM, Video Card (GPU), VRAM… If you click on Model/Serial Numbers – you will see every part of your console with it’s part number. I find this very impressive. Especially since you can self-repair your Steam Deck, and can see part numbers at iFixit.
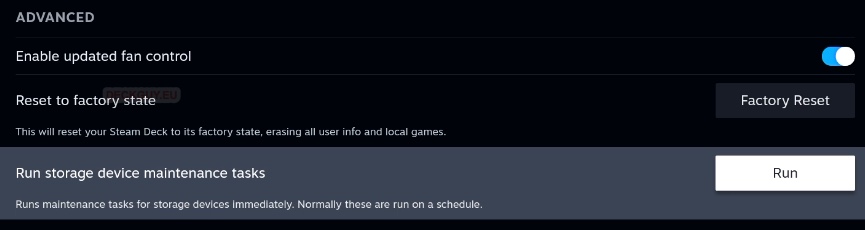
ADVANCED – if you wish to start over from a scratch – let’s see you were tinkering too much, and your Deck doesn’t work that well, or you wish to sell it – Factory Reset is the option you need.
Also, if you wish your Steam Deck a bit quieter, you need to “Enable updated fan control” – you r Steam Deck will be quiet, but also a bit warmer – it is good balance in my opinion.
Also, Storage device maintenance tasks can be run here – I Run that process to see what happens, but details are not shown. Probably SSD trimming/optimization is going on behind this Run button.
and that is it for the System Section of Settings.
Security
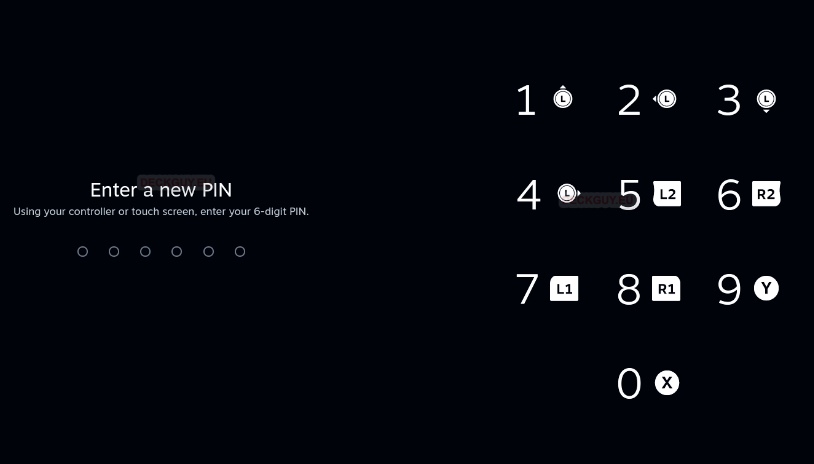
Under Security there is a LOCK SCREEN section – you can select if you wish your Steam Deck locked on wake and power up, before showing login screen, and while you switch to desktop mode.
It is definitely good measure if you carry your Deck around a lot. After you select some of the options, new screen will appear to define your PIN.

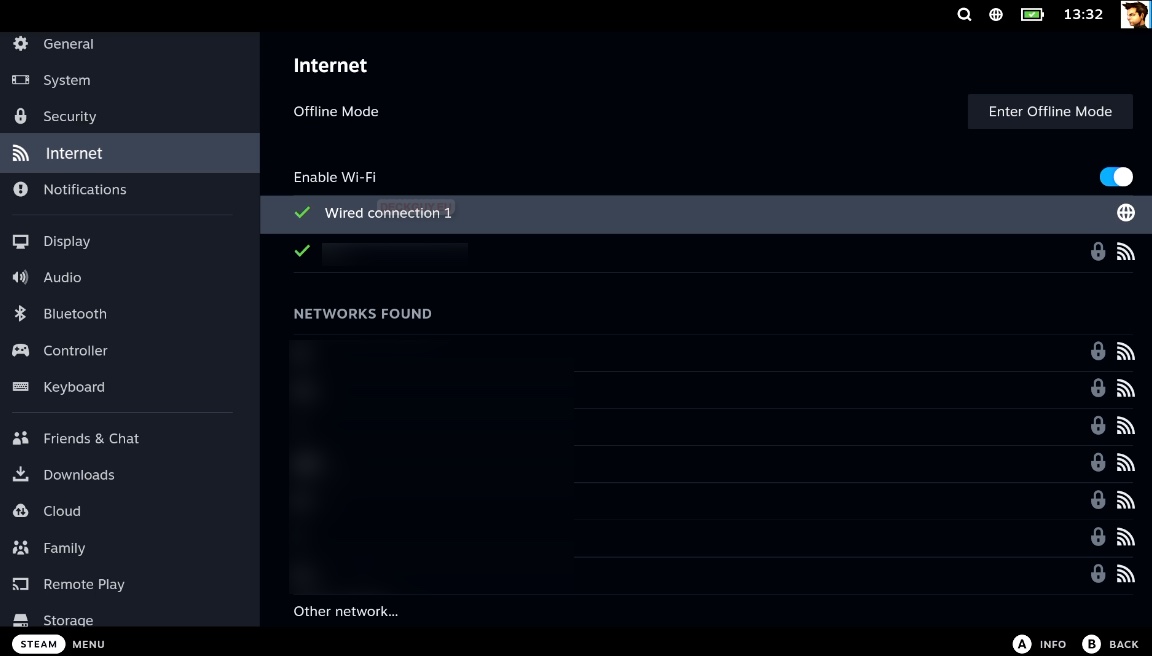
Internet
Here you can go into offline mode with Steam Deck – Steam games want to be online – so this mode can help you when you are in places without internet. Offline gaming is story for itself, and I’ll be covering that separately.
You will also see your current networks here, and be able to connect to a new one. If you press A while you are on your active connection, another window will appear, on which you can see your connection details – IP address, you can disconnect from the connection…

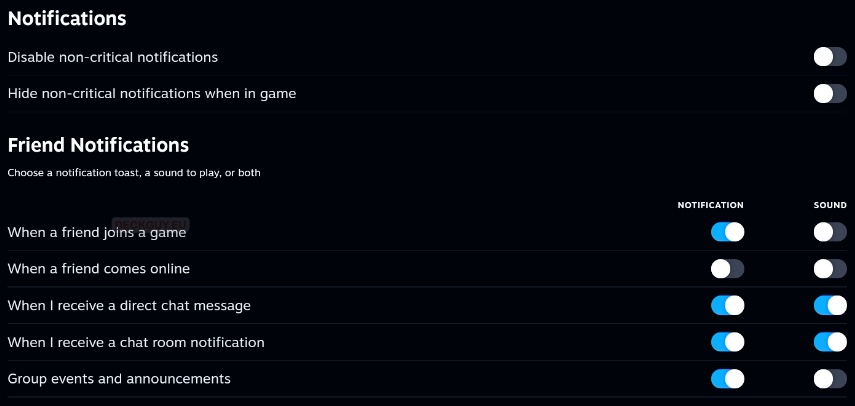
Notifications
Under notifications there is really not best practice – it is all up to you and your preferences – what you like and don’t like. Do you want to be notified while playing or not…
Display
Display is interesting section. First of all – you can connect external display/TV to Steam deck – that works very well (at least in my use case). However, if you are in Gaming Mode – screen on your Steam Deck will turn off, you will see only picture on external display (at least that is how it is on last day of 2022).
If you are using external display in Desktop mode – then you can select resolution, extend your Steam Deck display, or clone it. I’m very impressed with how this works.
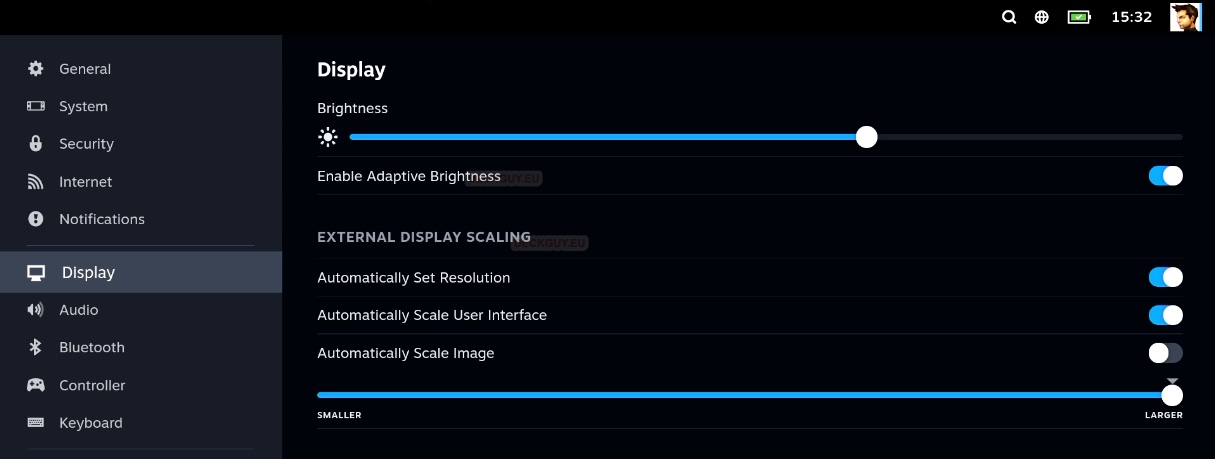
Now, to the Display settings
Brightness – I have “Enable Adaptive Brightness” on – it works ok for me.
EXTERNAL DISPLAY SCALING – also, I left everything as is, I tried this on couple of displays – 15″, 43″ and 49″ and I haven’t had any issues, it scales really nice.
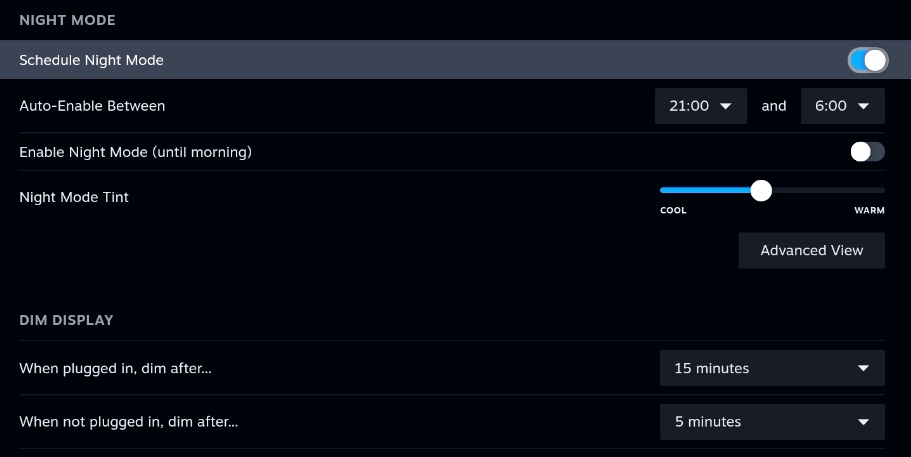
NIGHT MODE – both Night Mode and DIM display are your personal preferences – personally, I use Night Mode on whichever device I can, because it is much easier on the eyes. But, again, it all depends on software and situation where I use device.
DIM DISPLAY – I left it for now as it is, since dimmed display saves some battery, and if I can extend battery life – I will.
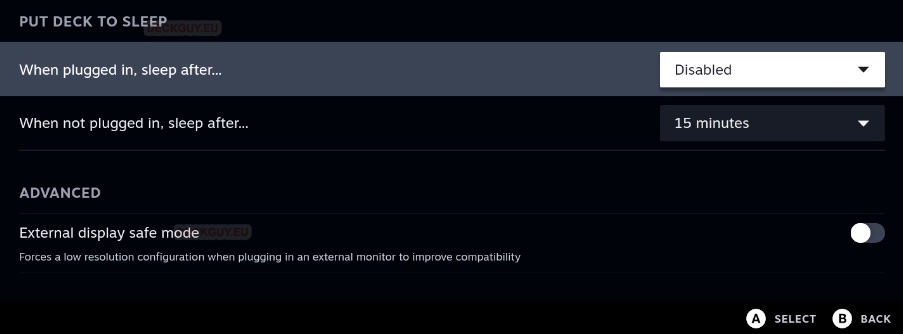
PUT DECK TO SLEEP – Now, this is the option to be careful about – while you want to conserve energy, there are some situations that you should think about – like Downloading games – if game is huge in size, and your internet connection not fastest on the planet – you may want to leave your Download overnight, or for a few hours. But guess what – it will stop if Steam Deck goes to sleep.
So, if you plan to Download something for few hours – make sure your Deck is plugged in, and that “When plugged in, sleep after…” is set to – Disabled (because 1 hour is most you can get from settings)
Again, all these settings are my recommendation – you can do whatever you wish and whatever suits you with your device.
ADVANCED – maybe you will be in a situation where your Steam Deck won’t work with external display – because of resolution limitation of the display for example. You can then try to enable “External display safe mode” so Steam Deck forces low resolution for you to be able to use that display. I still have to encounter that situation – but very useful option, since I had resolution struggles with my PCs in the past.
Audio
Again, and I will say this million more times – I’m impressed how well Steam Deck does some things – Audio being one of them. Quality of Steam Deck speakers is very good, but also is the ability of Steam Deck to recognise external Audio sources. So far I connected two different monitors with speakers to Steam Deck – one via external dock and HDMI, and other one via USB-C direct connection – both worked. Bluetooth speakers and headphones I have also worked out of the box. Really impressive stuff – speaking from the point that you can use whatever you can with Steam Deck, and are not limited to proprietary accessories or addons.
Audio – you can set Volume here, and select Source for your Audio (if you have docks, or external bluetooth devices connected to it)
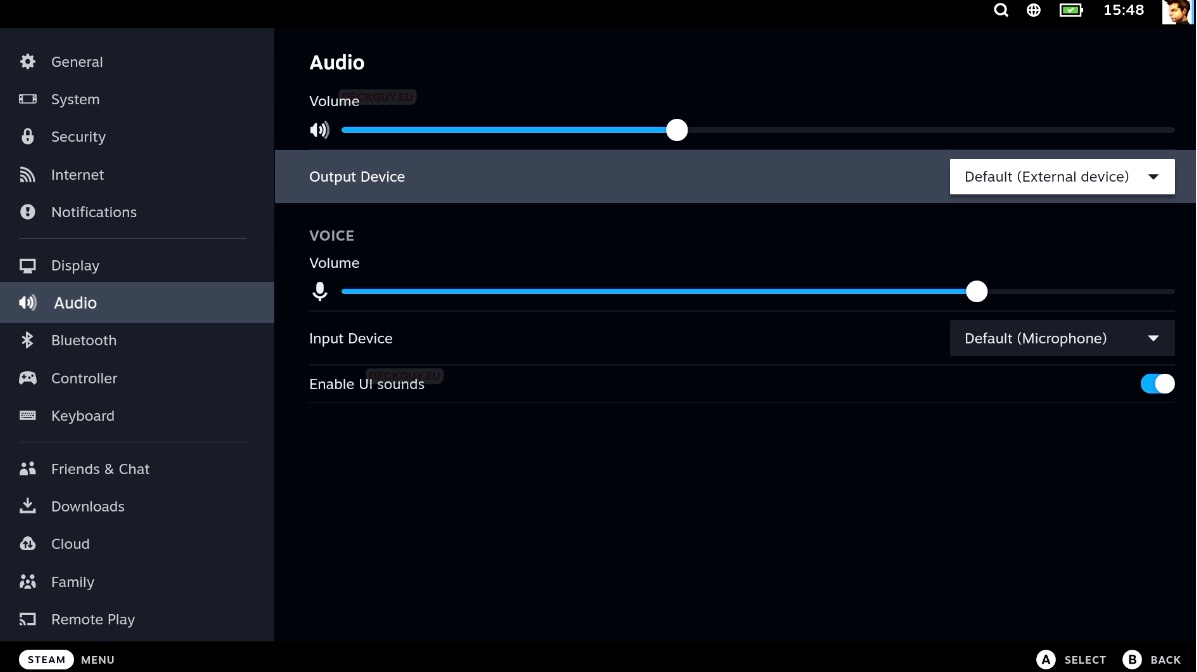

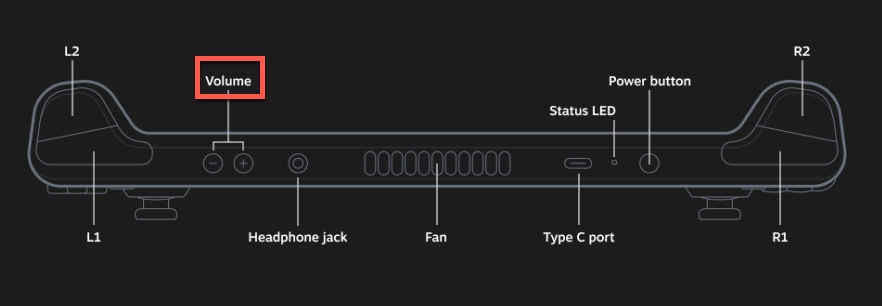
Volume can be regulated also with Volume buttons on top of your Steam Deck
VOICE – again, same options as with audio. If you have external sources for your Microphone, you can select them here and regulate volume of your Microphone setup.
Enable UI sounds – so far I like them, so user interface sounds (sound you make by pressing buttons, selecting menus) are enabled in my case.
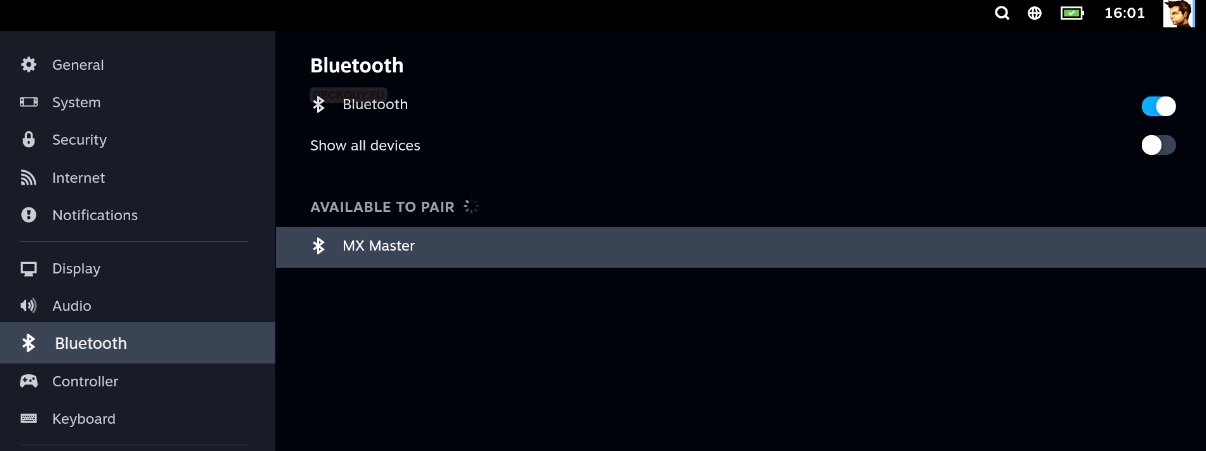
Bluetooth
You can pair load of things with your Steam Deck – headphones, keyboard, mouse… And all will be done here
Controller
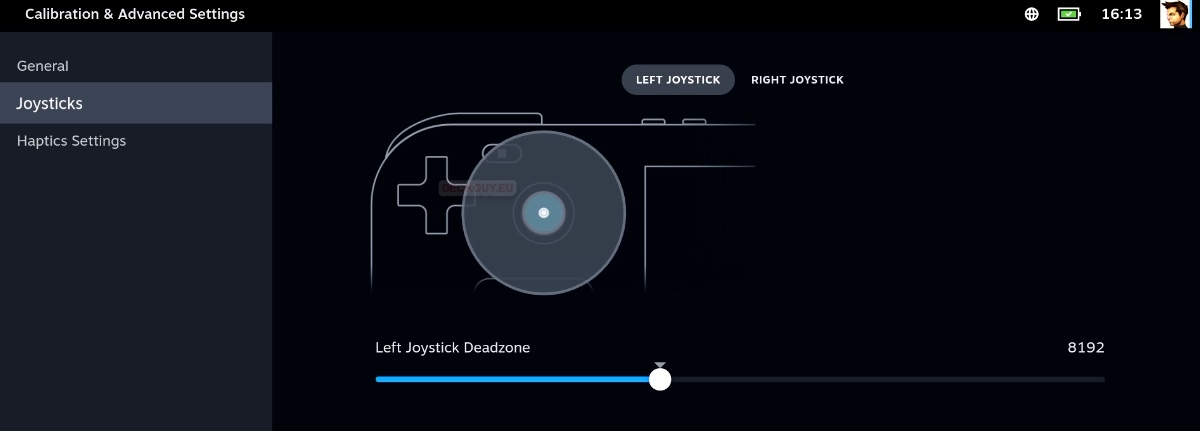
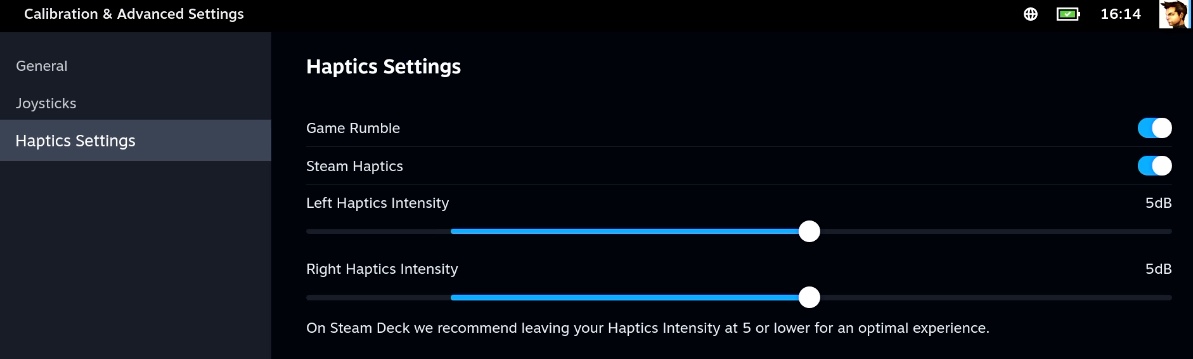
You can select here your haptics settings for your Steam Deck. Also, if you are used to Nintendo Switch layout, you can remap your Steam Deck A,B,X,Y to fit Nintendo layout.
If we click on Calibration & Advanced Settings and select Open – we can there calibrate our sticks, in case Stick Drift happens. or fine tune our Haptics Settings
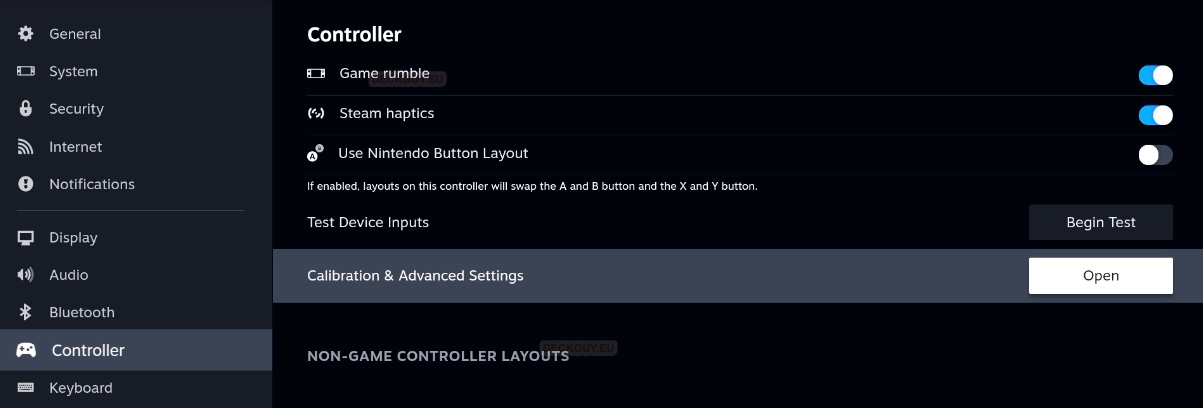
There are no Settings under General, just empty screen – so that is why I haven’t shown it.
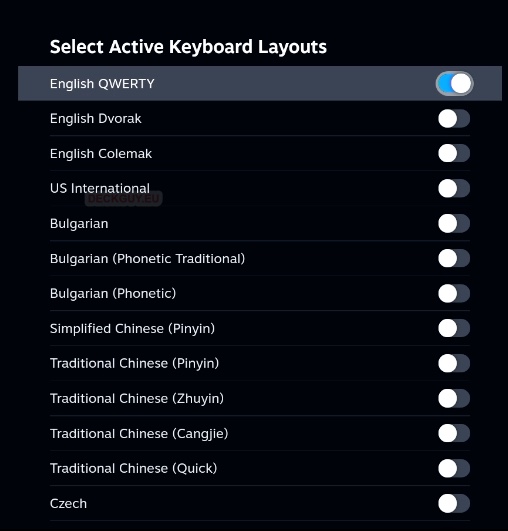
Keyboard
Here you can define your on screen keyboard looks, haptics and change layout of your keyboard.
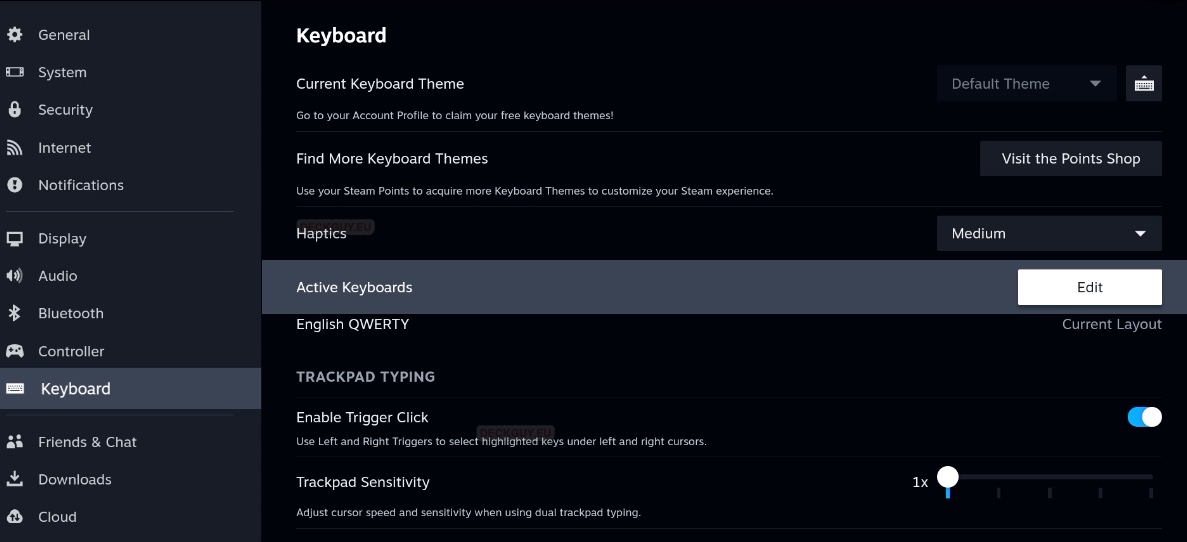
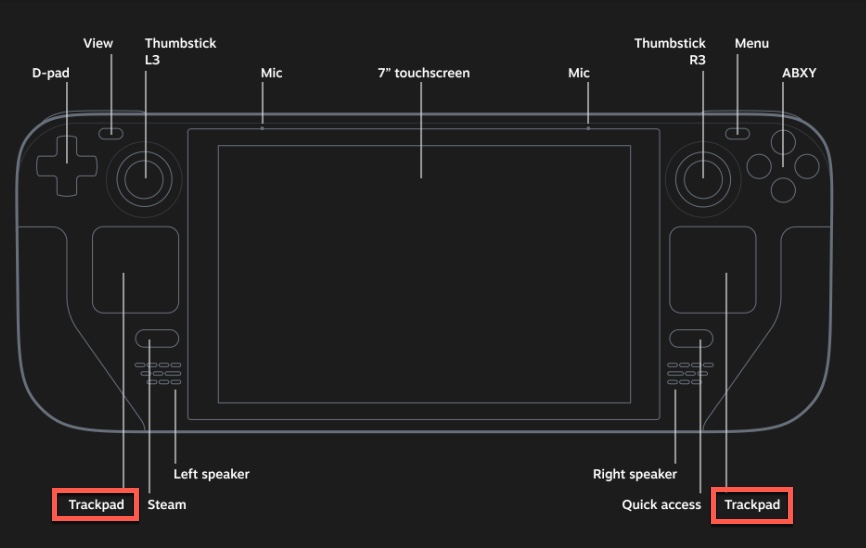
TRACKPAD TYPING – trackpads are two square touch sensitive surfaces on your Steam Deck. In keyboard section you can define if you wish to enable trigger click and adjust sensitivity of the trackpad.
Friends & Chat
One of the sections where you will sort settings according to your needs. I mostly use single player games on Steam, and those games that are multiplayer and I play with friends, we communicate through different channels.
Downloads
Useful section
Download region – select one closest to you – it will make your Downloads faster, latencies lower.
Limit bandwidth – useful if you have more things going on at once and your internet connection is not optimal – for example – you wish to stream a movie, and let Steam Download game on Steam Deck in meantime – maybe this will help your movie not stuttering.
Schedule auto-updates – again, if you want to do this while not using console (overnight maybe, this is good option)
Allow downloads during gameplay – could be problematic to turn on if you play something online, or game is demanding in resources…
Throttle downloads while streaming – again, good to have on, because it will manage your bandwidth better.
Display download rates in bits per second – turn on only if you like practicing calculation of bandwidth metrics 🙂

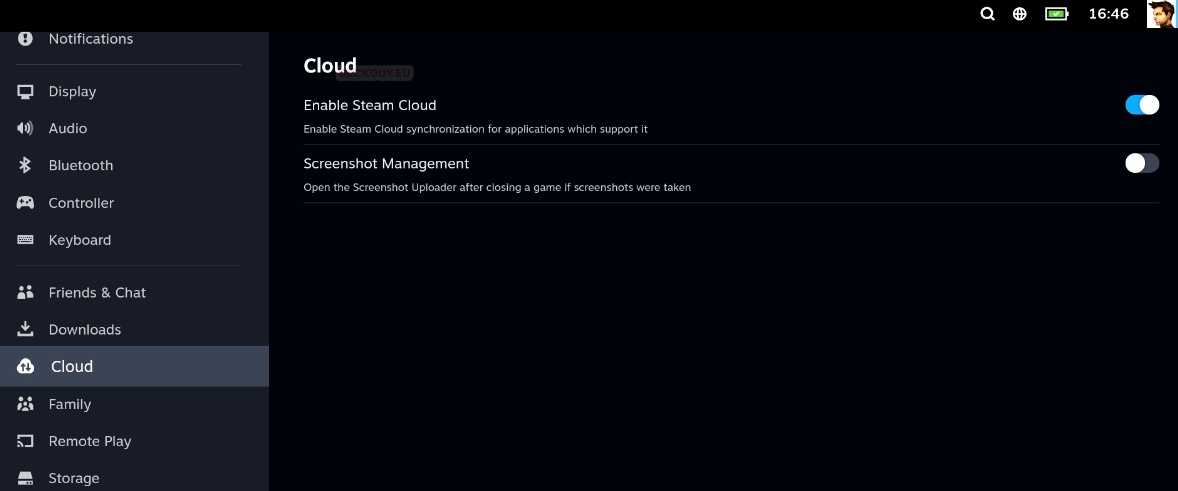
Cloud
Enable Steam Cloud – I would recommend this option and I use it for many years now. It will sync your game saves – if game supports it. What it means is, if you play on PC, and after that start same game on Steam Deck – you save will be on Steam Deck, and you can continue where you left of at your PC.
Screenshot Management – turn of if that is something you need and find useful.
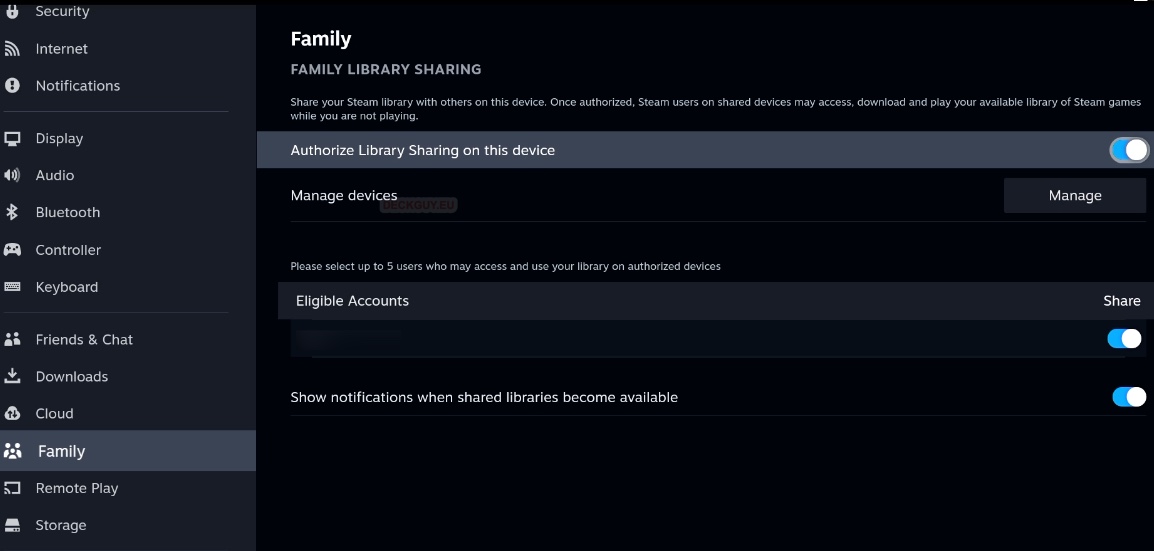
Family
Useful feature if you have family members that play on Steam. I used this scenario even for myself – I can be in a situation where I want to test performance of machine or cloud server if I’m curiours of GPU performance – but I don’t really want to enter my Steam account data on it, so I have “throwaway” account with which I share few titles just for test. After I’m done – I simply remove that account and rights. Good security practice
You can share your account with up to 5 users and also Manage Devices – define devices on which your library can be played.
So, great option if you have kids, or friends and family you wish to share some things with.
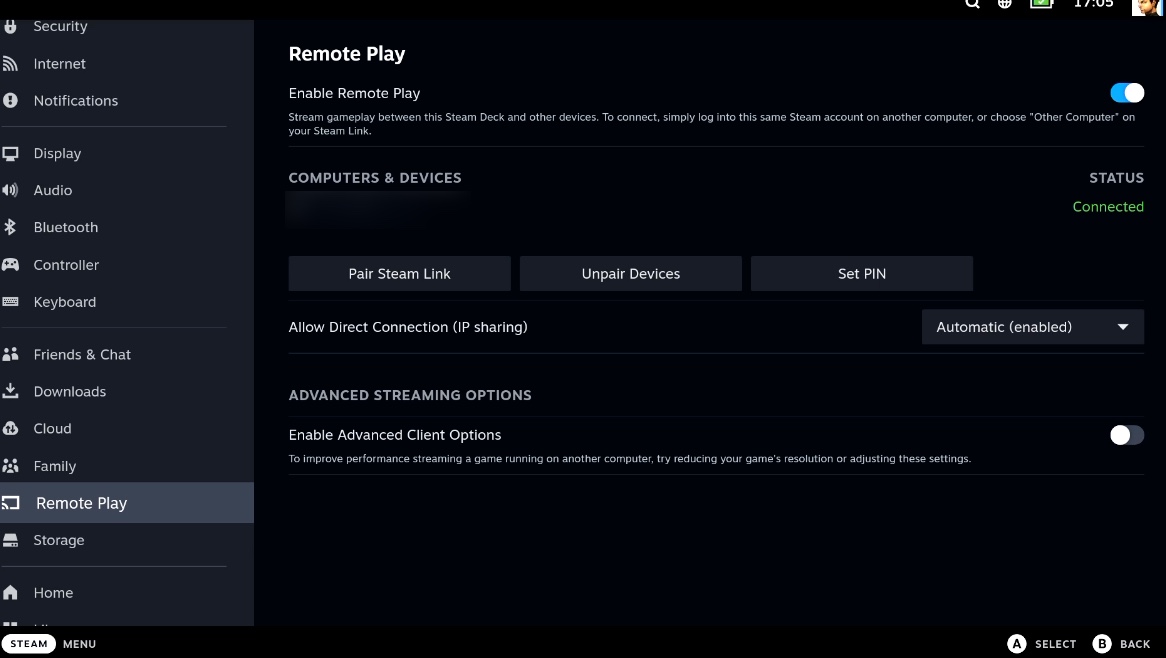
Remote Play
Another great option and reason why I love Valve/Steam and why I bothered to get Steam Deck. I sometimes want to play my Steam Games – but not on my main – powerful PC. So, what I would do is – I would power up that PC in my work room, and then go to bed, or living room with my Macbook Air and stream games from my PC and play them on Macbook Air, or Surface Pro X.
What is the point? I can play triple A games that are very demanding and resource consuming on underpowered and quiet machines like Macbook Air or Surface Pro X where ever I want (as long as I’m in the same local network). I really use this feature a lot. Not sure what will be situation now I have Steam Deck.
As you can see, Enable Remote Play is enabled on my Steam Deck – again, I you find this useful, and have multiple devices you wish to play on – this is the way. Important thing to mention is that you have to login on all your devices with same account.
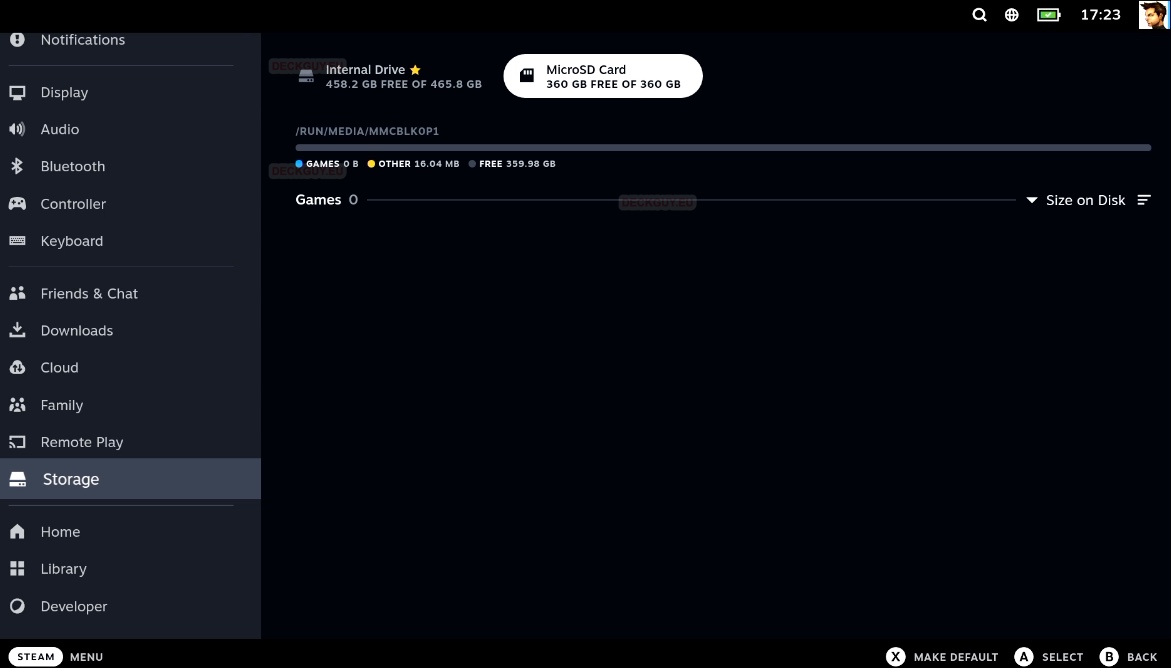
Storage
Place on which you will manage your – Storage. Having enough disk space is always a struggle, especially on gaming machine.
Here you can see what takes the space on your Steam Deck
I also have MicroSD card, so it is also shown here. You can see what you have installed, and make your external, or internal storage – default for installations and media. You can also sort alphabetical, by size or last played.
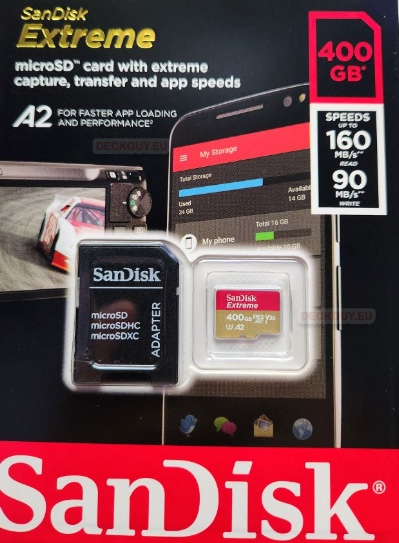
In case you are wondering what MicroSD card, I’m using – it is one depicted below (it is picture of my actual MicroSD). MicroSD cards are topics for itself, so I will be covering that also in depth.

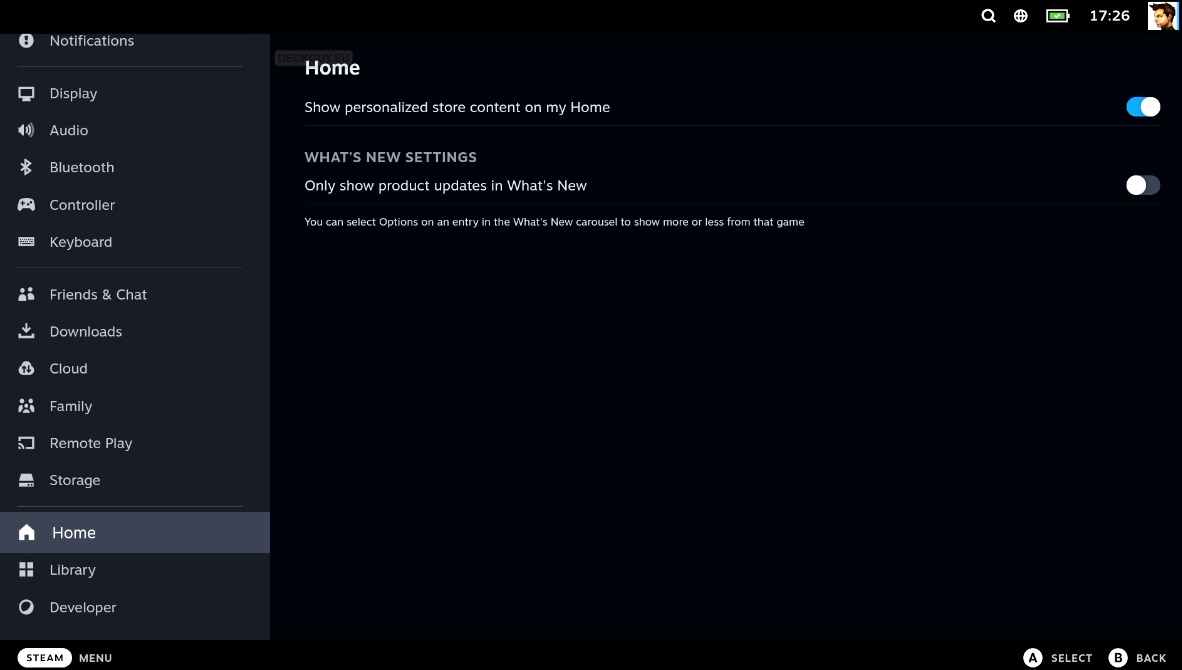
Home
Home screen customization – one of the things you set to your liking.
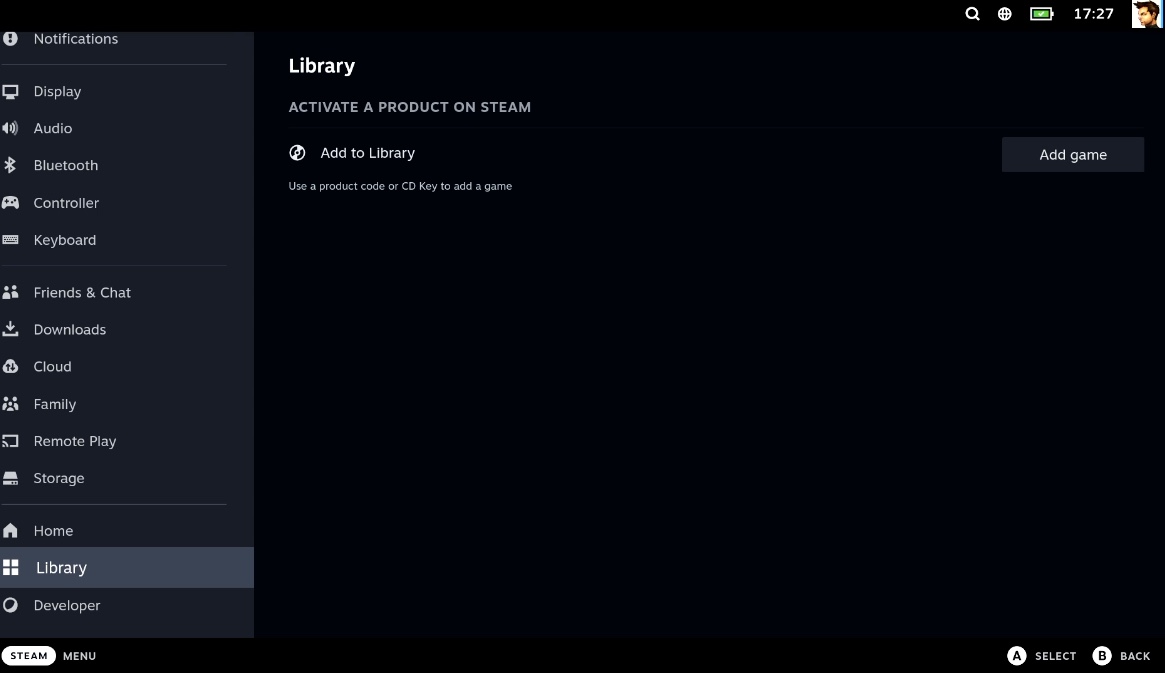
Library
If you bought or got a key for game on Steam, you can use it through this interface. I did that couple of times with Humble Bundle, and it works great. So, if a game is bought for Steam – outside of Steam store – this is a place to activate it.
That should be the last menu in Settings – if you haven’t enabled Developer options.
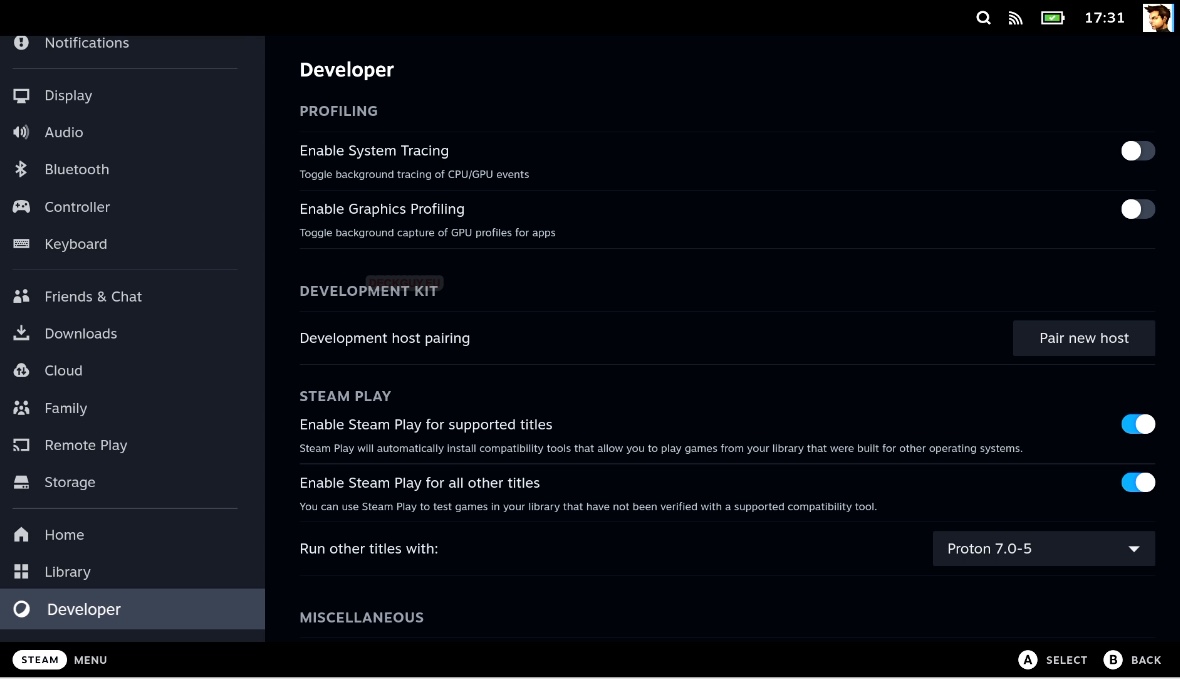
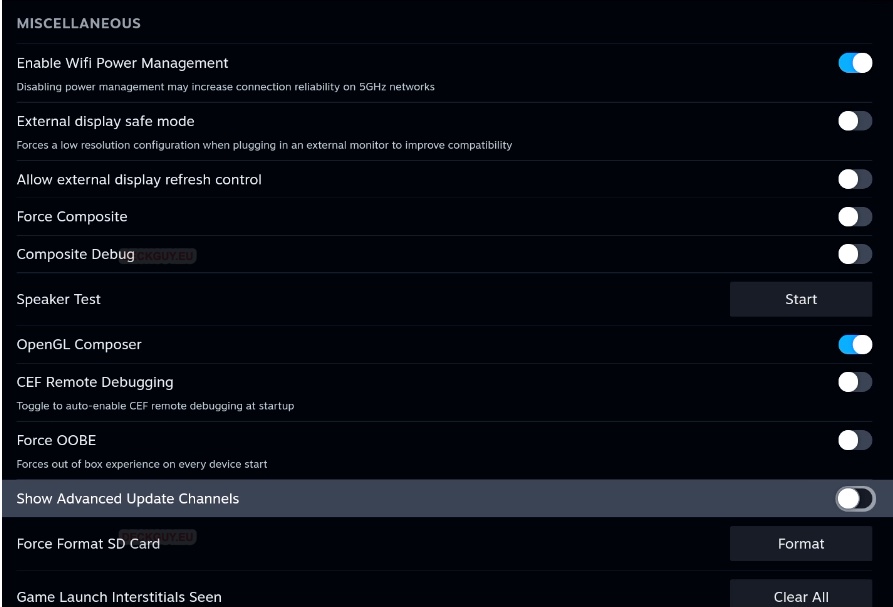
Developer
I won’t go through this menu in details. I also do not recommend messing with these options unless you know what you are doing. Developer options sometimes can be useful when you troubleshoot your device (or develop for it) – but in general – look, don’t touch if you don’t know what this is.
I will only screenshot/list Developer options here, without going into details.

Ok, finally we are done with Settings section under STEAM button
8. STEAM button – Power
Final option under STEAM button menu, if we select it, we will get our power options. We can put our Steam Deck to Sleep, Shutdown or Restart. Also, we can log on to another account if we have multiple accounts on Steam Deck, we can Restart Steam if something is wrong with Steam.
Switch to Desktop will switch us from Gaming Mode to Desktop Mode – again, Steam Deck is fully fledged PC. Here you can read on how to switch to Desktop Mode on Steam Deck.
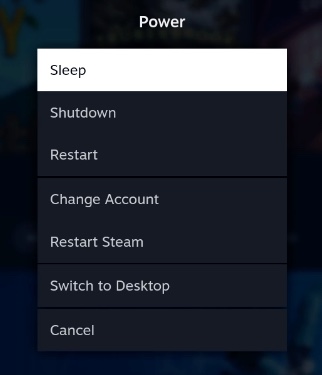
Physically, Power button is on top right part of Steam Deck
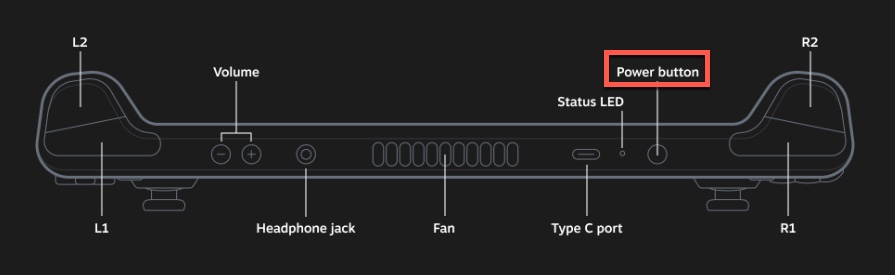
If you short press Power button – you will send your Steam Deck to sleep. If you long press Power button – you will get menu just like I pictured above, with all additional power options (Sleep, Restart, Switch to Desktop…)
With Power Menu under STEAM button we covered all the menus and options on Steam Deck in that section.
Part 2 of this guide with very important Performance settings for our Steam Deck can be found here