
In Part 1 we went through every menu and option that Steam Deck offers after pressing Steam button. Now, we will go through options and menus of Quick access button.
First, let’s define where Quick access button is. Right side of Steam Deck (on side where Y,B,A,X button are) above speaker grill.
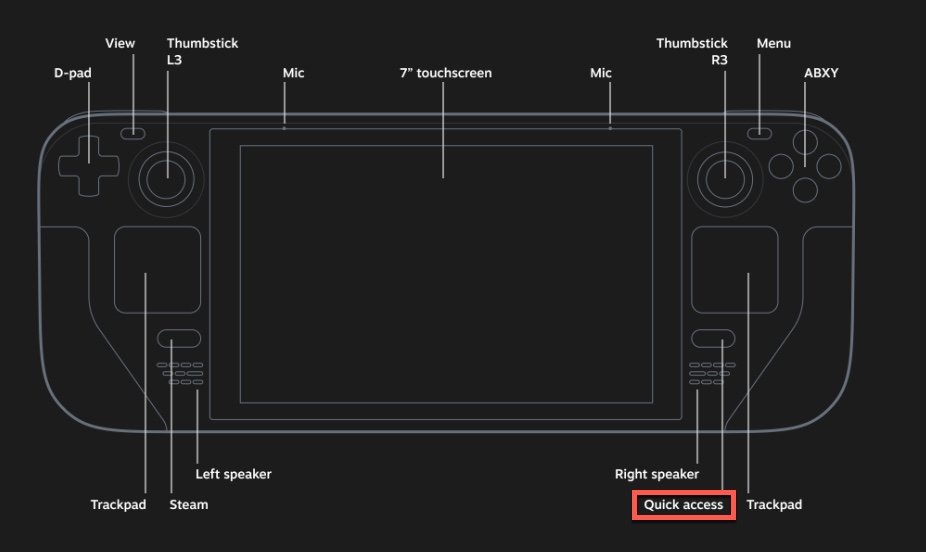
If you press and hold Quick access button – you will get same as with long Steam button press – list of shortcuts

If you just press Quick access button, you will get following menus
- Notifications
- Friends
- Quick Settings
- Performance
- Help
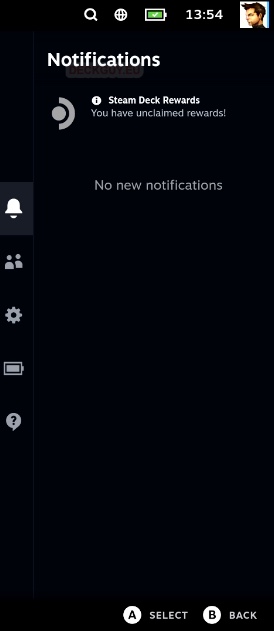
1. Quick access button – Notifications
All your notifications will appear here – and you can access them from this menu
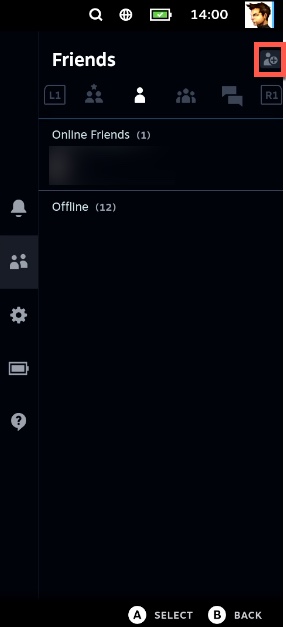
2.Quick access button – Friends
Here you can see your Favorites list, your Friends, Group chats and Recent Chats.
You browse through these tabs by pressing L1 or R1 buttons on the shoulders of Steam Deck.
In Friends tab – you have an option (in top right) to Add a Friend. In Groups you have same little icon at the top through which you can create New Group Chat.
3. Quick access button – Quick Settings
Quick Settings menu on Steam Deck is something like notification center on your smartphone.
You can quickly adjust BRIGHTNESS, AUDIO – both speaker and mic volume, under OTHER – you can turn on/off Airplane mode, Wi-Fi, Bluetooth or Night Mode.
Tweak your Brightness setting as needed because it can save you battery life, so if surrounding light conditions are fine, turn down your Steam Deck brightness. Also, turning of Wi-Fi, Bluetooth can preserve battery life.
CONTROLLER section gives you access to Game rumble and Steam haptics option – you can turn them on/off here.
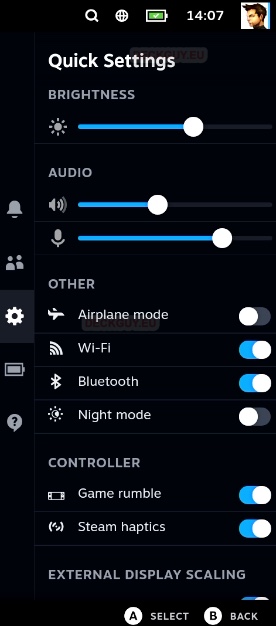
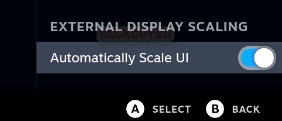
at the bottom there is one more option for EXTERNAL DISPLAY SCALING – you can turn on/of automatic scale of user interface on external displays.
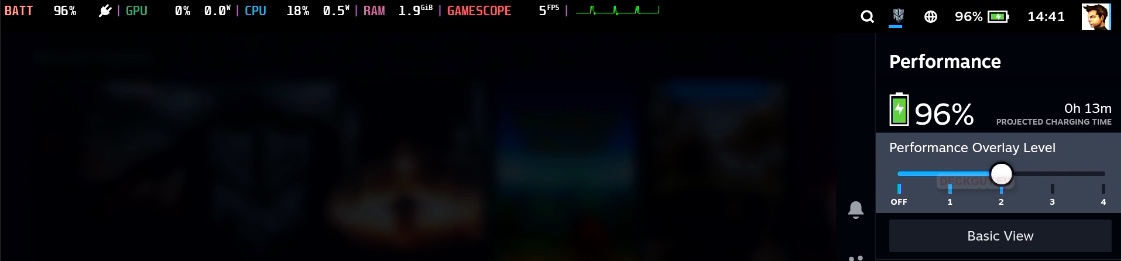
4. Quick access button – Performance
This is most important part of Quick access button menus (at least for me). Here you will define performance level of your Steam Deck for games – you can define one setting as default, and also customize per game. This is very important part because you can fine tune your gaming experience on Steam Deck here.
You can adjust performance and battery life. If your game is choppy/stutters on Steam Deck – here you can adjust Framerate Limit so it runs smoother. If you would like your battery to last more, or system to run quieter and cooler – you can adjust TDP settings. Let’s go step by step.
At the top you can see your Battery status – projected charging time if on charger, or projected battery life if running on battery. We will switch our Performance menu to Advanced mode
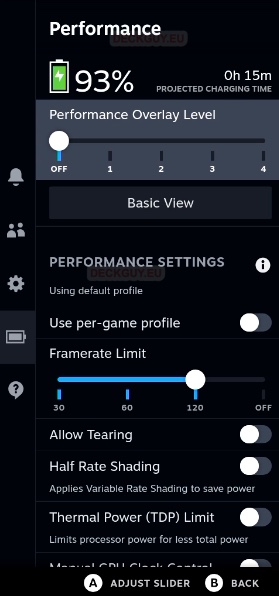
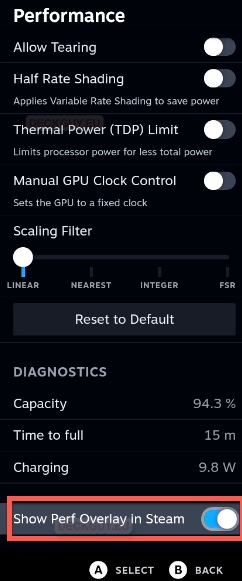
Beneath battery status is Performance Overlay Level – by default it is off, and you cannot turn it on. To turn it on, scroll to the bottom of Performance menu and turn on Show Perf Overlay in Steam. This way you can now see performance stats on your Steam Deck. Let’s go back to the top of the Performance menu
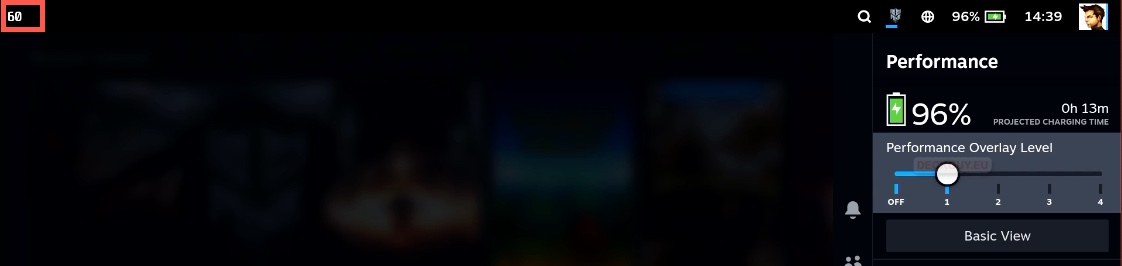
Go to Performance Overlay Level press A to Adjust Slider and select 1 we will see framerate at top left corner of the Steam Deck.
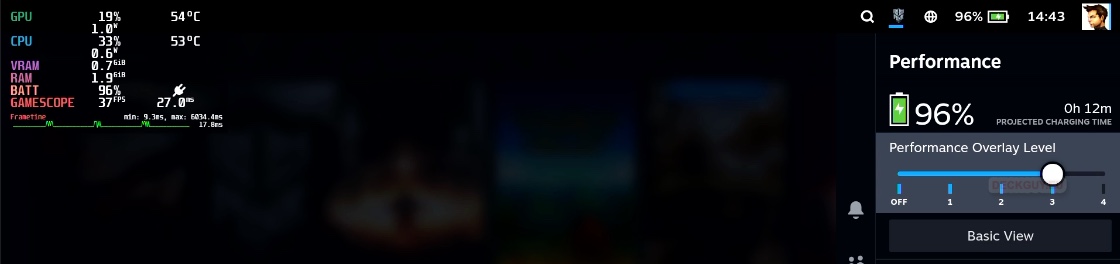
Level 2 of Performance Overlay will give us battery, gpu, cpu, ram and FPS info.
Level 3 will rearrange our Performance Overlay and give as additionally VRAM and frametime in details
And finally Performance Overlay Level 4 will give us additional per CPU core view, RPMs of FAN, Frame Count…
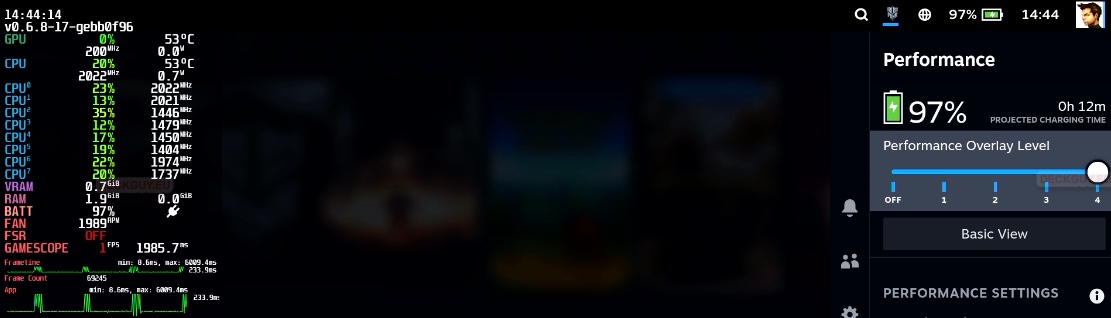
Select what fits you best, and adjust your view. Performance Overlay is very useful feature in games, because it gives you live stats on how game you are playing performs on Steam Deck. By looking and CPU, GPU, RAM, FPS stats, you can better understand bottlenecks and problems a specific game creates for your Steam Deck. With the data you receive from Performance Overlay you can then adjust game settings, and/or Steam Deck Performance Settings.
PERFORMANCE SETTINGS
There is no best practice here, or “one size fits all” – you will set performance settings based on what games you like to play, how much latency you can tolerate, do you prefer battery life over game details, and how often you use external monitors with your Steam Deck. I will try to explain best I can all of these options, because behind every one of them there is complex and very detailed technology that is sometimes difficult to put into few sentences. I will also try and show by example what every option does.
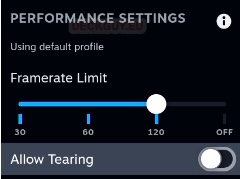
If we click on PERFORMANCE SETTINGS inside Performance menu on Steam Deck we will get screen with explanation below. You can create Performance Settings per game, or have default one that applies to a game, if game doesn’t have game-specific performance profile.
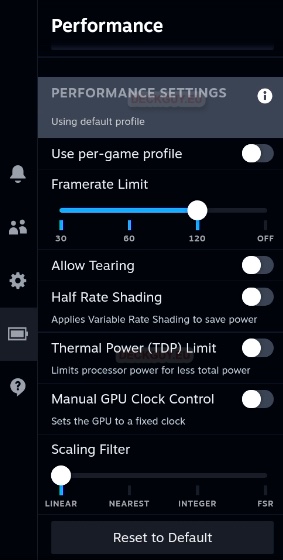
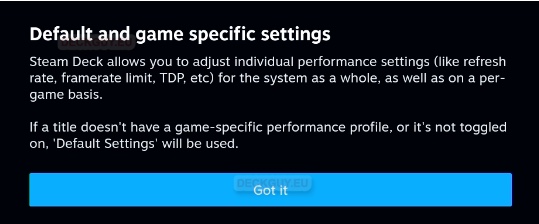
Use per-game profile – while you are in the game, you can press Quick access button, navigate to Performance menu turn on Use per-game profile and then select settings you wish to apply to game you are playing. This is the best way to define your Performance settings – per-game.
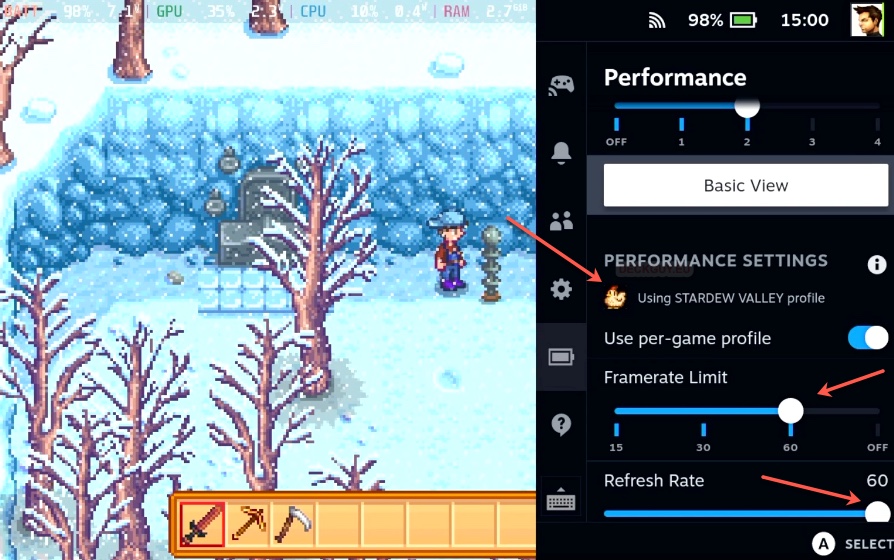
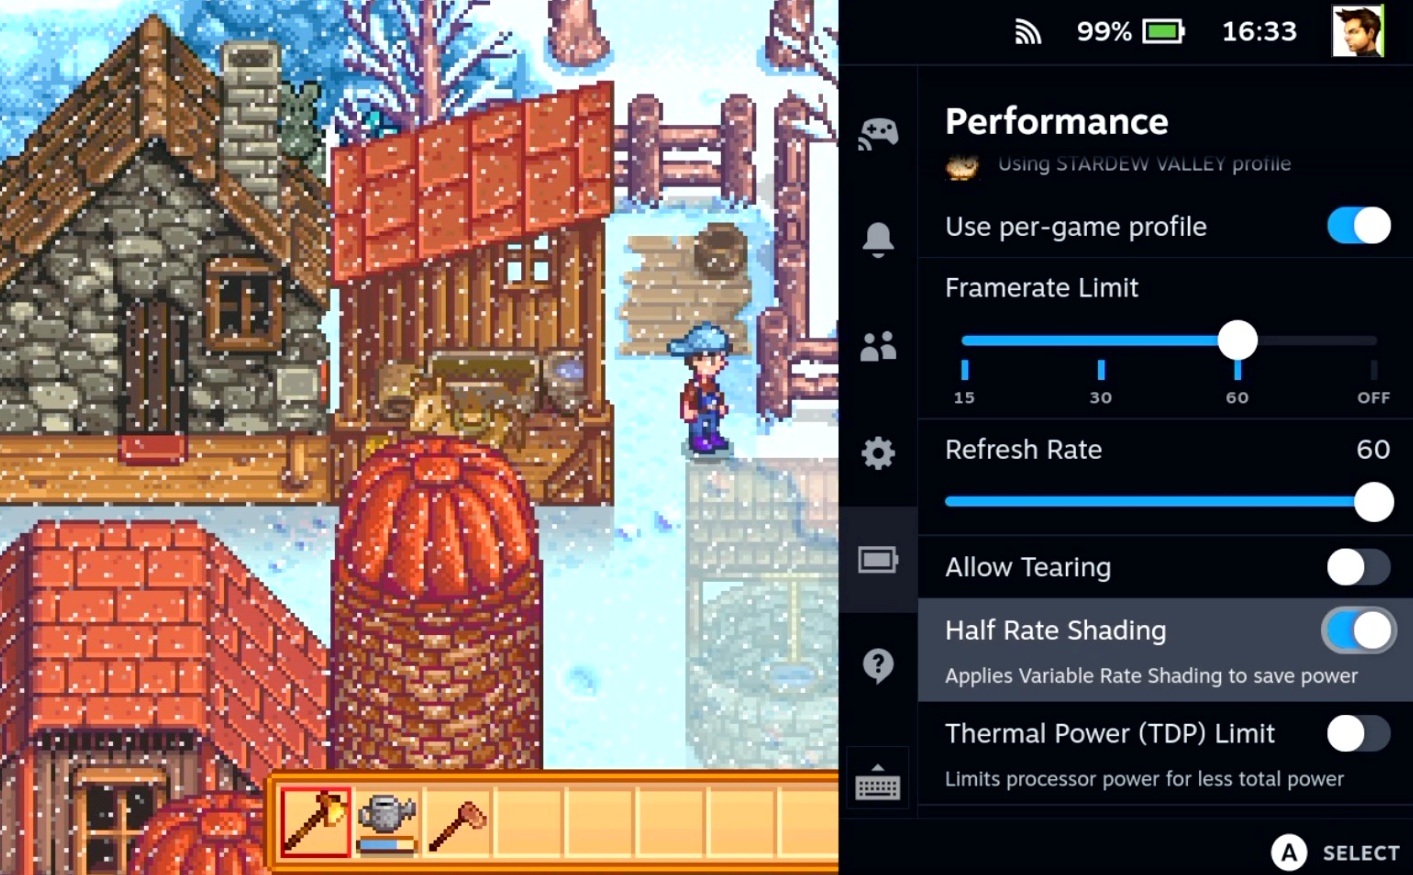
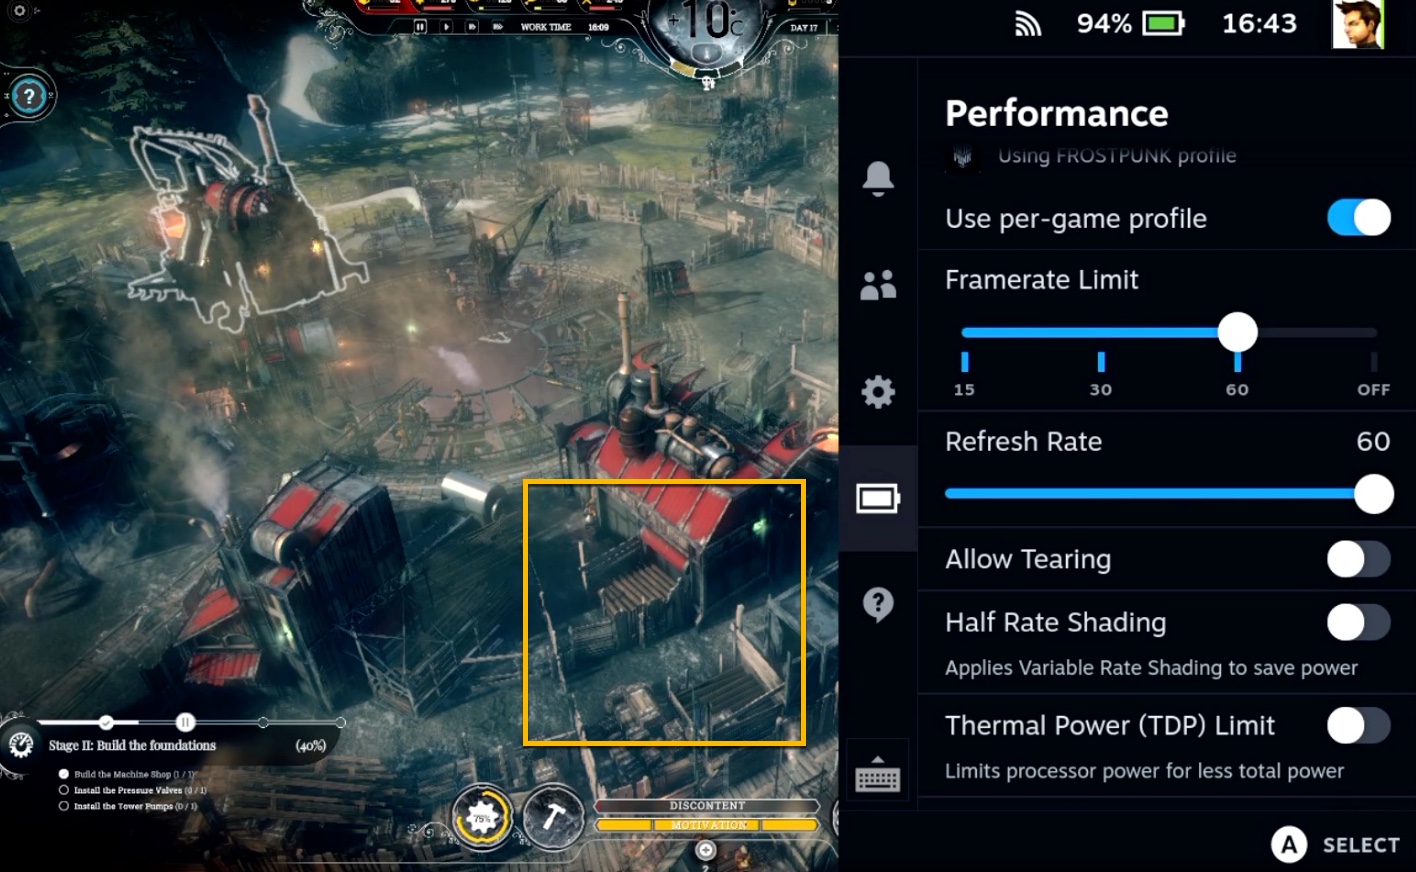
Quick example – two games – Stardew Valley and Frostpunk – I set these just to showcase difference in per-game profile, these are not best settings for either of the games.
I turned on “Use per-game profile” for both games on Steam Deck. You can see that Framerate Limit is 60 and Refresh Rate also 60 for Stardew Valley.
Frostpunk at the same time has Framerate Limit of 20 and Refresh Rate 40.
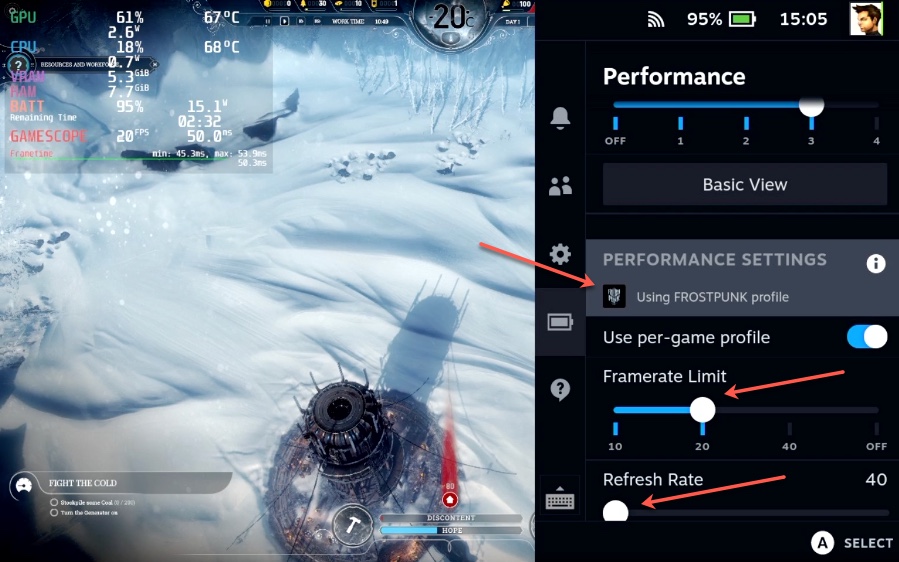
Every time you start a game – you’ll get Performance settings for it specifically, if you set “Use per-game profile” to on.
Ok, now we understand “Use per-game profile” option.
Framerate Limit – 60 FPS (frames per second) is standard for smooth gaming in PC world for years. How many FPS you get from a game depends on your hardware (graphics card). If game is laggy and stutters, you will also see that through FPS – you will get 5, 10, 15 FPS in game. That is usually sign that your hardware (graphics card) is struggling with game graphics – game is maybe new and asks for top performing hardware.
The more FPS you have, the game looks and plays smoother. 60FPS = game frame updates every 16 milliseconds, 30FPS = game frame updates every 33 milliseconds. 40 FPS = game frame updates every 25 milliseconds. The quicker the game updates – you will get smoother picture and gameplay feeling. That is quick explanation in layman terms.
Framerate Limit can also affect battery life – more FPS = shorter battery life. Find sweet spot for you on game to game basis – which Framerate setting will play smooth and give you best battery life.
Now, if game doesn’t run smooth on your Steam Deck – you can set in game graphics to lower settings. Also, you can set Framerate Limit on Steam Deck to 30 or 40FPS. Play with settings to see what works best for you.
You can also set Framerate Limit to Off, which means there is no Framerate Limit – but that doesn’t really make sense on Steam Deck – maybe if you run very old game that is not graphically demanding on Steam Deck – which is hooked up to modern 120Hz+ monitor.
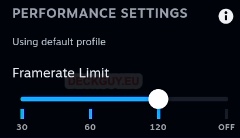
I left default value of 120 FPS, but will optimize my Framerate Limit per game as I shown above with Stardew Valley and Frostpunk examples.
Steam Deck framerate limit can have sweet spot at about 40FPS – games don’t stutter, and are playing nice with a bit better battery life.
Here are two practical examples one with good framerate, and another one with bad
Refresh Rate – you will get this option while in game setting Performance options. Refresh Rate can be set from 40 to 60 Hz. It is measure for the display. Again, refreshing less will save you battery life, but higher Refresh Rate gives smoother gameplay experience.
But, if you don’t balance right your Refresh Rate with Framerate Limit we talked about above – result may be game stuttering. You should balance your Refresh Rate and Framerate Limit to avoid screen artefacts (tearing which we will talk about below).
Framerate Limit is far bigger battery hog. Some quick recommendations – start with 30FPS and 60Hz Refresh Rate, and play with FPS settings (and Refresh Rate). Main goal with this combo is to save some battery life, and have satisfying and smooth gameplay. It really varies from game to game, on some games you won’t gain much, while on others you will get better battery life.
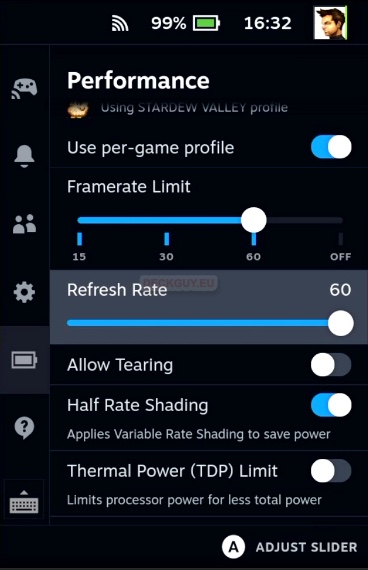
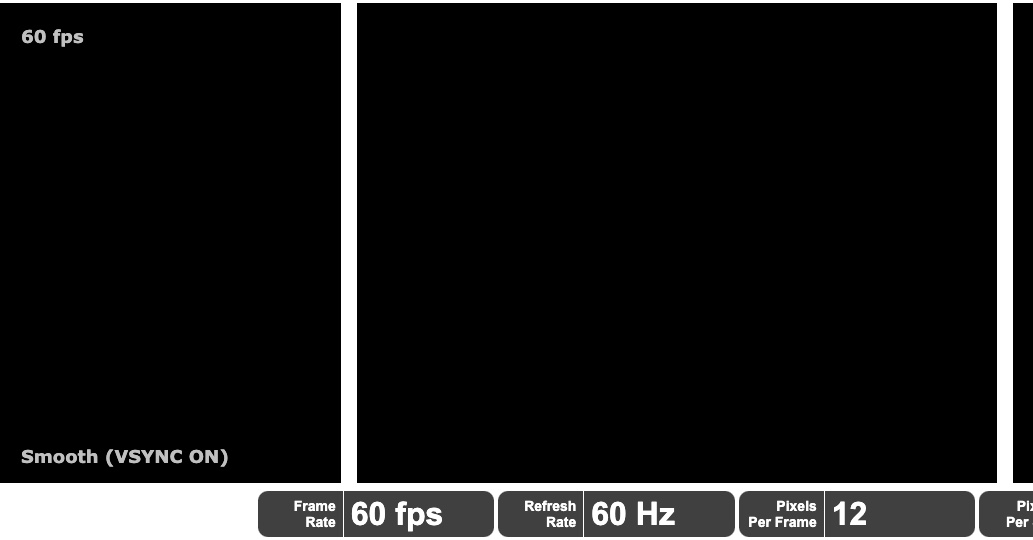
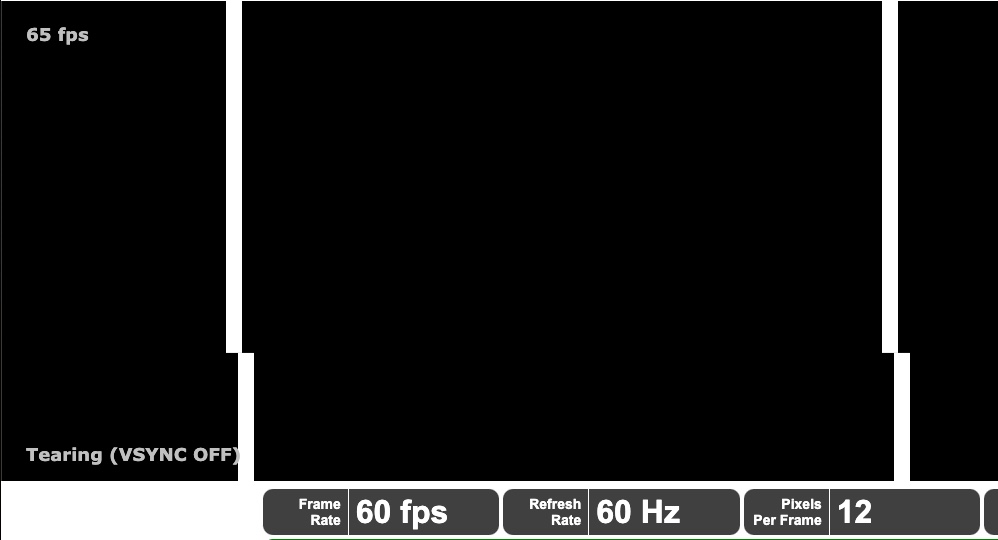
Allow Tearing – again, I could write an essay here – basically, what you need to understand is that screen tearing occurs when graphics card (GPU) frame rate and monitor refresh rate are not synchronised. It is manifested at the display – there is line somewhere on the screen that is splitting game picture in two parts – usually upper part of the game picture is misaligned with lower part. VSync helps with screen tearing problems, and is by default enabled on Steam Deck. However, VSync can cause additional latency, which is why some players like to turn it off, at the cost of graphics artefacts – this is where Allow Tearing option comes to play – when enabled you will (at least I hope) reduce latency and maybe have screen tearing or artefacts in game.
If you are interested in details on screen tearing, VSync on Steam Deck, there is good in depth writeup on reddit the problem.
Here is a link to good site that simulates Screen Tearing. I understand better most things better in practice, then in theory – so below are two samples of screen tearing.
No screen tearing sample
Screen Tearing
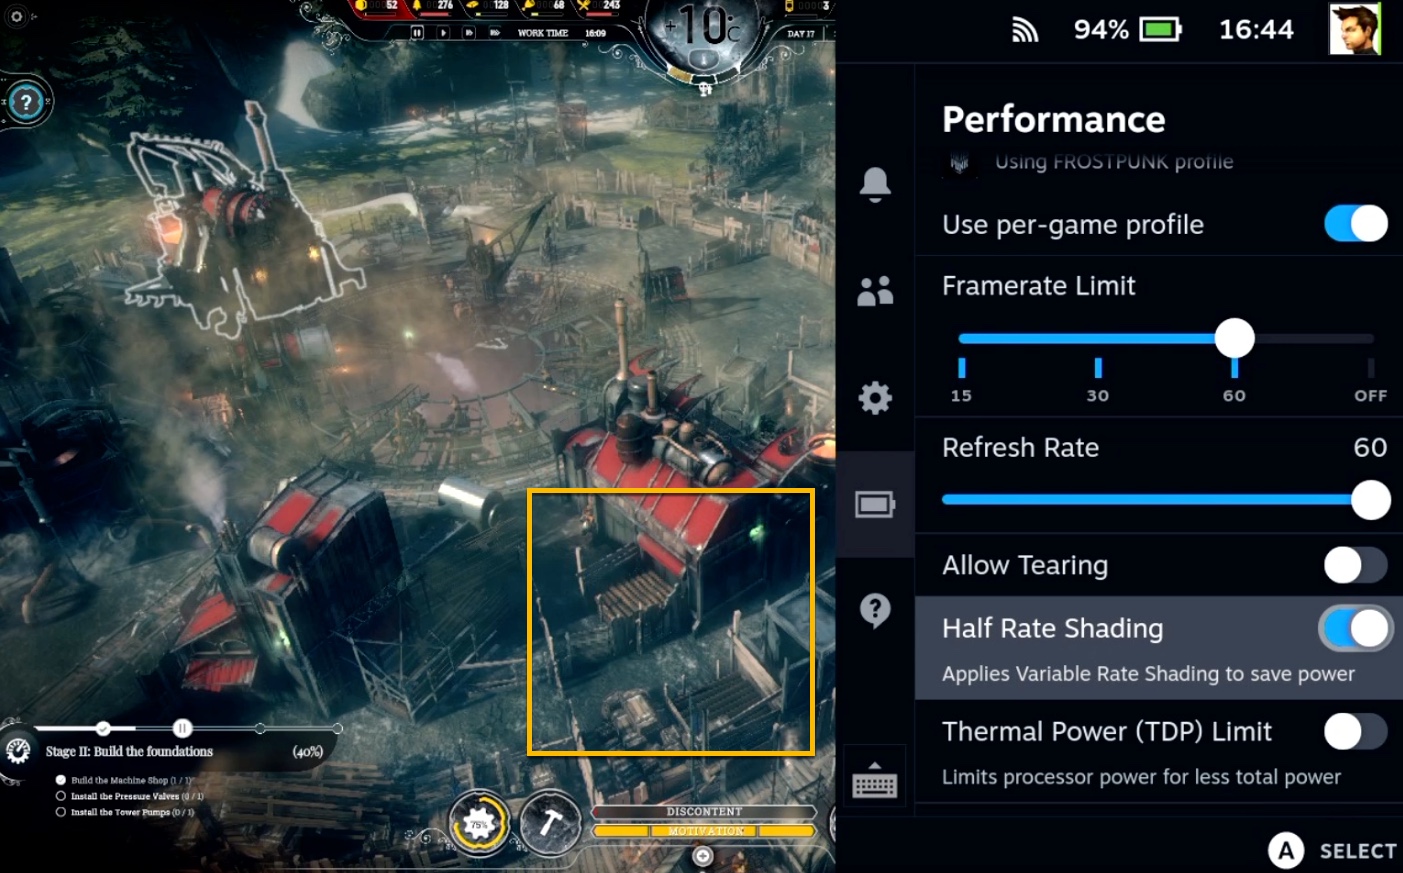
Half Rate Shading – again, quick explanation – Half Rate Shading cuts the resolution of pixel shaders – in half. Games with turned on “Half Rate Shading” will probably look uglier – but benefit is improved battery life – in some cases it can be significant – but only in some cases. Best to try this option for yourself in every game and decide if it looks nice and playable to you.
When I turn on “Half Rate Shading” in Stardew Valley for example – I can see no difference in graphics quality, and I can squeeze not minutes, but hours more from my battery. Usually pixel based games are best with this option – you don’t lose much with graphics and battery gains are good.
However, in Frostpunk you can see a lots of details and difference. Game looks smoother without Half Rate Shading
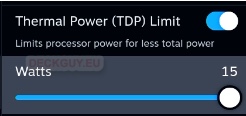
Thermal Power (TDP) Limit – demanding games require more power from your Steam Deck processor (CPU) – more power means more heat, louder fans and faster battery depletion.
If you play some new triple A games like Cyberpunk on your Steam Deck – you really have no choice – TDP should be at maximum – not limited.
But for games such as Stardew Valley, which is not very hardware taxing – we can spare some watts and play with cooler Steam Deck.
Turn on Performance Overlay while gaming and look at frame rate on your game. Gradually decrease Thermal Power Limit from 15 Watts to lower values – one by one. Stop when frame rate starts to decrease. You can optimize your TDP per game also (where it makes sense – usually at older/simpler games)
Lowest you can go is 3 Watts.
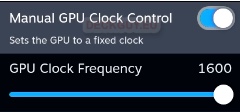
Manual GPU Clock Control – You can also play with your graphics card – there are also gains to be had by manually selecting GPU Clock Frequency on per game basis. All these settings we went through give you a nice package with which you can fine tune performance and battery life of your Steam Deck. You can combine GPU Clock with FPS settings and see what gets you smoothest gameplay or best battery life.
Again, really no good recommendations – again, per-game profile and tweaking is the best way.
Some games will have performance gains with lower (and fixed) GPU clocks, while other will have gains with higher GPU clocks (again fixed). There is lively discussion and lot of suggestions on this topic.
Lowest you can go is 200.
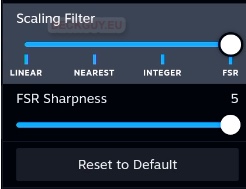
Scaling Filter – Scaling Filter has four settings – Linear, Nearest, Integer and FSR. But, what is Scaling Filter? With Scaling Filter you should be able to run games at lower resolution and upscale them to devices native resolution.. This should give you better performance without losing graphics quality (in theory).
For our usage – optimal should be Integer scaling (2D games) or FSR (for 3D games)
Linear, Nearest and Integer Scaling don’t have any sub-options, while FSR does. Tweak FSR Sharpness until you find balance in FPS and resolution.
FSR balances CPU and GPU usage and can result in better performance of the demanding games – however as all the settings above – at a cost of battery life. Tweak on a per-game basis.
Here is short and good explanation of every of those four I found on Reddit in r/integer_scaling
Here is the link to original comment
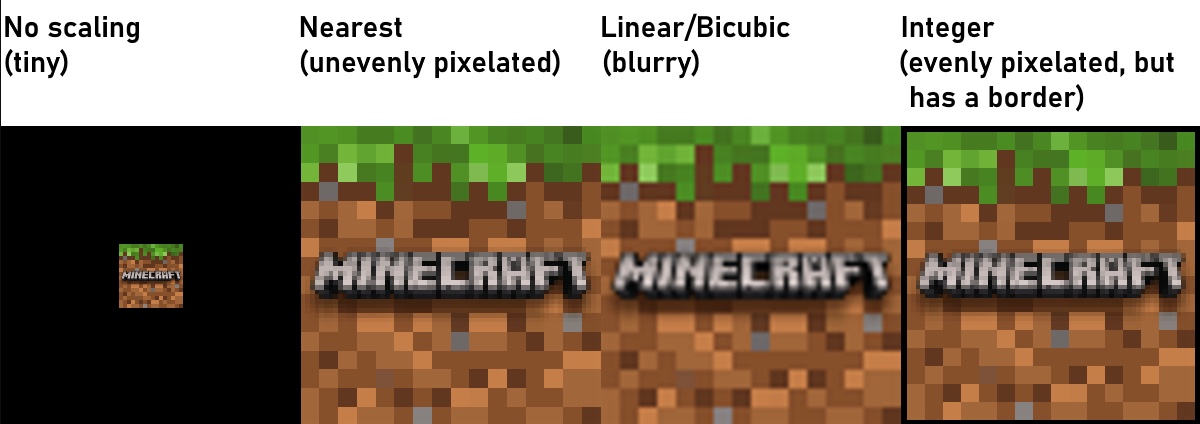
- Linear is apparently the regular blurry (bilinear or bicubic) upscaling.
- Nearest is Nearest Neighbour — an algorithm similar to integer scaling, but not locked to integer scales, so the screen space is used fuller, but there may be distortion and pixel shimmering at non-integer (fractional) scales due to different pixel sizes such as 1×2, 1×1, 2×1, 2×2 in the same image.
- Integer is pixel-perfect integer-ratio upscaling we are all interested in here in this sub. 🙂
- FSR (AMD FidelityFX Super Resolution) is an open upscaling algorithm by AMD, based on the Lanczos algorithm, that provides results similar to nVidia DLSS, but with no need for tensor hardware cores, though typically of lower quality.
And here is the example of Linear, Nearest and Integer scaling.
If you want to know more about scaling here is a good start.
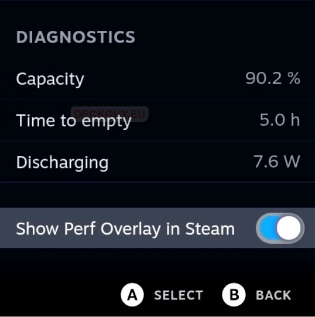
DIAGNOSTICS – we went over “Show Perf Overlay in Steam option at the beginning, since it was prerequisite for Performance Overlay to work.
So, we are left with DIAGNOSTICS. In Diagnostic section you can see how much battery you have left, when will it be empty, and how much wattage Steam Deck is drawing from battery at the moment. While on charger, you will see charging capacity here.
That is it for Performance section.
5. Quick access button – Help
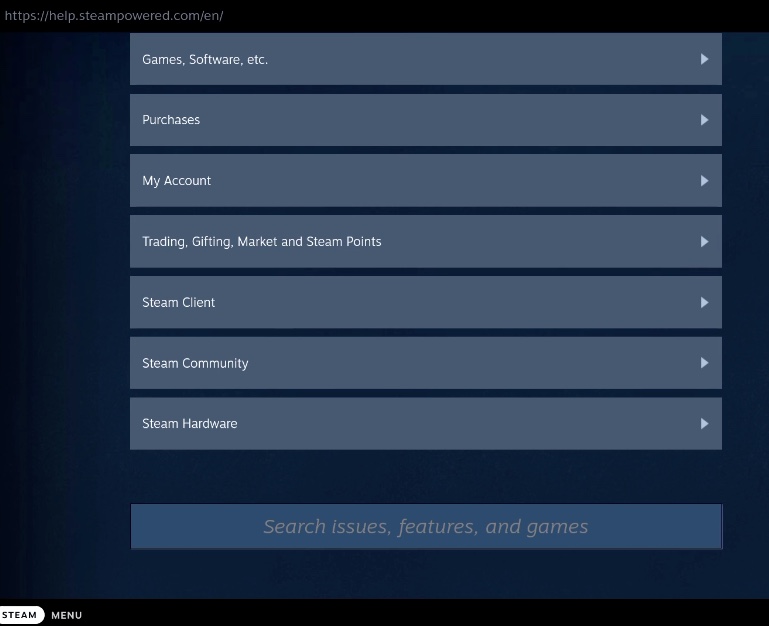
I won’t spend much time here. Help section will take you to Steam Help site
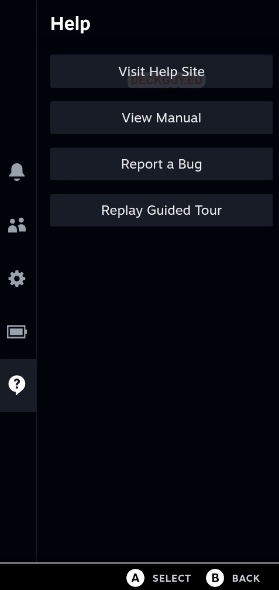
Steam Help Site divided by sections where you can find more info about Steam software, games and hardware.
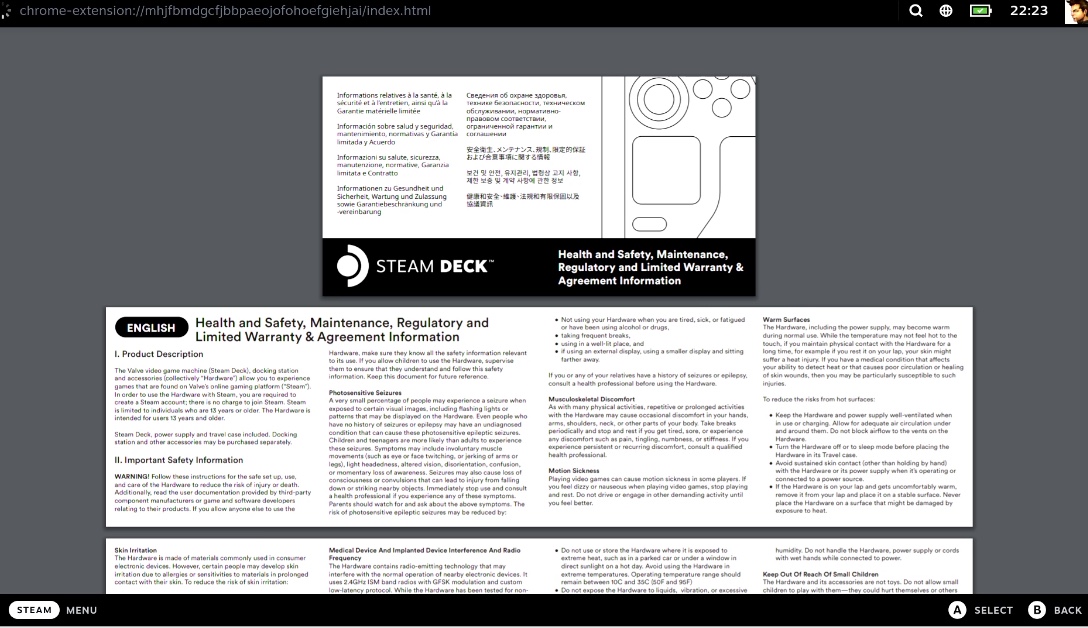
View Manual will lead you to Health and Safety, Maintenance, Regulatory and Limited Warranty & Agreement Information
In the end, you can Report a Bug or Replay Guided Tour we went through in initial setup of Steam Deck.
That is it, we went through every part of Quick access button menus.
In case you missed, here is Part 1 of this guide which covers all settings behind Steam button on Steam Deck